Reading time: 7 min read
How to Publish Sitecore Global Data Sources Without Republishing Pages With Next.js
Learn how to isolate a globally used data source without running into the trouble of republishing all pages
Start typing to search...
Learn how to isolate a globally used data source without running into the trouble of republishing all pages
When setting up the Page Designs we have for our project we have data sources that are shared between most of the pages, for example we may need the header, footer and sitewide banners as global data sources. Because they are globally shared by adding them into the Partial Design of the Page Designs of most of the pages when we try to publish them it will affect most of the pages and will republish them.
There will be times where we actually wouldn’t want this to happen. Imagine if you still have pages that you would prefer to be put in Draft or you were creating revisions to existing pages and need them hidden for now. By publishing these globally used data sources it will force those exceptions to also publish.
We have created a workaround for this which would isolate your global data sources publishes while your pages can still grab the latest updates without the worry for the pages to actually be republished.
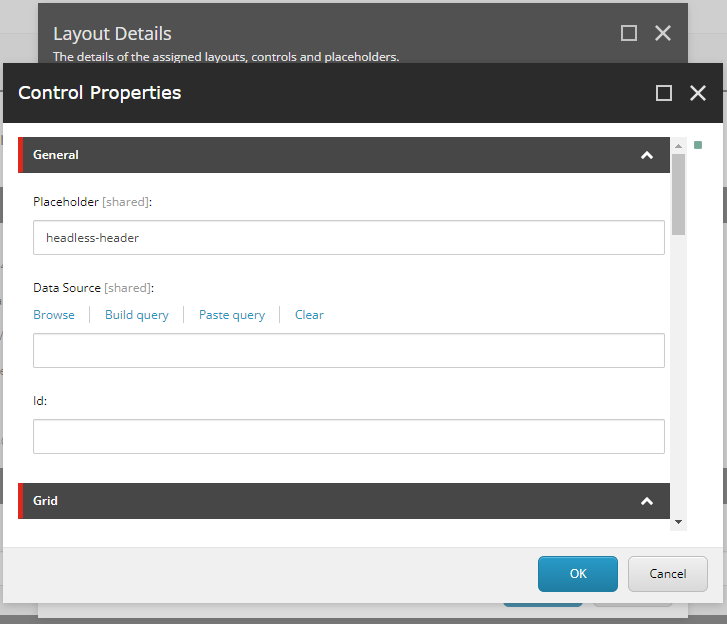
To solve this problem, we leverage the feature of API Routes in Next.js. A quick idea of what we’re doing is detaching the link between the Partial Designs and the Data source itself. Let’s start with creating a simple object, we will need a banner that should appear on all pages. After setting up the templates, rendering and adding it into our Partials, we want to focus more on the Layout Details. On that specific component we would normally add a Data Source to it but this will add a dependency on all pages that use this Partial Design.

Our goal is to let this component still work by allowing it to still function even without a data source involved. In order to add in the connection between the global data source and the component we need to use the getStaticProps function and by grabbing the data source using GraphQL.
We don’t really need to update anything on the Sitecore side of things. Just be sure to remove the data source in your Partial Designs. You’ll notice on the initial publish that it will affect all pages again. This is fine because it just means it’s removing the dependency to the old data source. The only thing needed in Sitecore is removing the data source.
Most of the work will be on the frontend for the solution. Here are the pieces we’ll need to create.
getStaticProps into our component and pass in the item data into our component.Like any standard GraphQL fetch we’ll need to know what fields and what templates are involved. On our little example we will need to imagine of a Banner template which consists of two fields, a body **and a link. You will get an example fetch like the function below. We’ll store this in a file inside the lib folder of the frontend folder structure. You could also add this in a subfolder called graphql just to organize all the GraphQL fetch functions on one location.
import { gql, GraphQLClient } from 'graphql-request';
import config from 'temp/config';

export const bannerQuery = async (datasource: string, language: string) => {
  const graphQLClient = new GraphQLClient(config.graphQLEndpoint);
  graphQLClient.setHeader('sc_apikey', config.sitecoreApiKey);
  const query = gql`
    query {
      item(path: "${datasource}", language: "${language}") {
        ... on Banner {
          id
          body: field(name: "body") {
            ... on RichTextField {
              value
            }
          }
          link {
              id
              url
              target
              text
              anchor
          }
        }
      }
    }
  `;
  const data = await graphQLClient.request(query);

  return {
    data: data,
  };
};
Our function accepts two parameters, the datasource and language. These two parameters will determine the location of the item and what language we would prefer.
We will start adding a new API in our Next.js project. You can do all the needed flags for any possible errors and catches for missing variables but we’ll keep it simple with the code below.
import { bannerQuery } from '../../../lib/graphql/banner.graphql';
import { NextApiRequest, NextApiResponse } from 'next';

export default async function handler(req: NextApiRequest, res: NextApiResponse) {
  try {
    const { datasourceId } = req.query;
    const datasourceIdString = datasourceId as string;
    const result = await bannerQuery(datasourceIdString, 'en');

    // Return the result
    res.json(result);
  } catch (error) {
    // Return an error message
    res.status(500).json({ error: 'An error occurred' });
  }
}
To make sure it’s authorable, let’s update the env file and add a new variable. We’ll need to update our GraphQL query by changing the static ID there with the env variable. We can name this new variable as BANNER_ID.
BANNER_ID=GGGGBBBB-XXXX-YYYY-ZZZZ-EE26KKKKPPPP
With the ID above we can pass the environment variable into our component using the getStaticProps feature. I’m assuming we already have our Banner component file setup already.
export const getStaticProps: GetStaticComponentProps = async () => {
  const bannerID= process.env.BANNER_ID;

  return {
    bannerID: bannerID,
  };
};
Inside the component render function we can add fetch call inside a useEffect to grab the data for our banner.
  const [bannerData, setBannerData] = useState(null);

  useEffect(() => {
    if (sitecoreContext?.pageEditing || typeof window === 'undefined') {
      return;
    }

    if (bannerID === undefined) {
      console.error('No datasource ID provided for the banner');
      return;
    } else {
    const BANNER_API = '/api/banner';
      if (initialized.current) {
        return;
      }
      initialized.current = true;

      const finalSubmitPath = addQueryStringParameters(BANNER_API, {
        datasourceId: bannerID,
      });

      fetch(finalSubmitPath, {
        method: 'GET',
        headers: {
          'Content-Type': 'application/json',
        },
        cache: 'default',
        next: {
          revalidate: 600,
        },
      })
        .then((response) => {
          if (response.ok) {
            return response.json();
          } else {
            throw new Error('Fetch failed');
          }
        })
        .then((data) => {
          setBannerData(data);
        })
        .catch((error) => {
          console.error('Error confirming account information:', error);
        });
    }

    /* eslint-disable react-hooks/exhaustive-deps */
  }, [bannerID]);
I’ll walk you through some of the important pieces of code above. First, we would need to setup a useState which will hold the data needed for our component. Next our useEffect will trigger when we receive our bannerID. The rest of the code may be just some standard checks for any possible errors happening within the render.
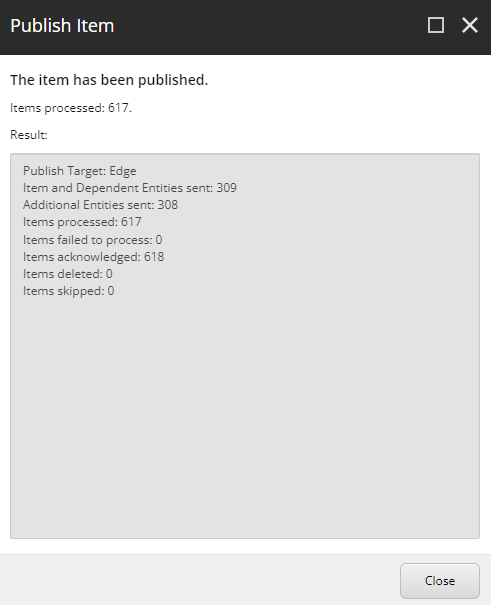
Make sure you have already removed the data source in the component in your Partial Designs. Initially, when you publish the data source item, it will show that it still has a lot of related items that are processed because this step means that the items has been detached on those items.
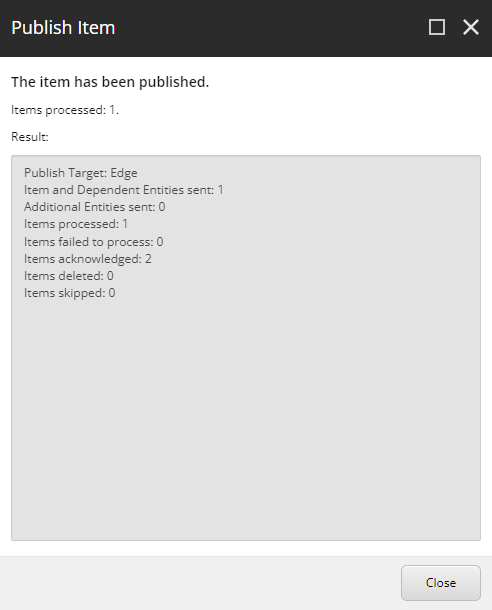
When you do another publish, you will see that there all the related items will be reduced down to a single item being processed and this is our goal.
You will encounter certain situations where you will have some draft pages which the company may not be ready to publish yet. With these draft pages, they will require relations with global data sources. If these data sources are are to be published it will affect all related items which we do not want to happen. This is why we want to look into ways to work around this problem. In the solution we find a pretty neat way of how we can still create a single data source for Partial Designs without having it affect all the pages.