Reading time: 22 min read
Architecting Complex Sitecore Forms with Next.js in XM Cloud
Build more sustainable forms, no matter how complex they are. Your Sitecore JSS code will never be cleaner
Start typing to search...
Build more sustainable forms, no matter how complex they are. Your Sitecore JSS code will never be cleaner
This blog is going to go in-depth into an easy way to architect a complex Sitecore form. However, step zero is deciding if using this method will be beneficial to you. If you haven't already, you should determine if Sitecore Forms can manage your form creation. Sitecore Forms is an XM Cloud Forms Builder that streamlines the process of creating visually appealing and easy-to-use forms on web pages.
Now that you know Sitecore Forms can't meet your needs, we can start planning our Next.js JSS implementation. If you think your business's unique use case fits into at least two of the following options, then it's a good sign that my structure might work well for you:
The first step is understanding what the code will look like. Yes, obviously it's going to be Next.js and TypeScript — but I'm talking about the overall layout of the code. We want to split our code into categorizable chunks; each chunk should be an isolated part of the code. Then, inside each chunk, we can create children chunks. The idea is to split up the design into potential .tsx files before we even start coding. You want to be pretty meticulous about splitting out everything you can.
Here is an example form from Dribbble that I'm going to split up into code-organized chunks. Each rectangle will be its own
.tsx file, and each child rectangle is another child .tsx file. The goal is to create lots
of smaller files that are easy to understand when you open them. Instead of creating a large 2000-line file, you
should aim to create six files with around 330 lines of code each.
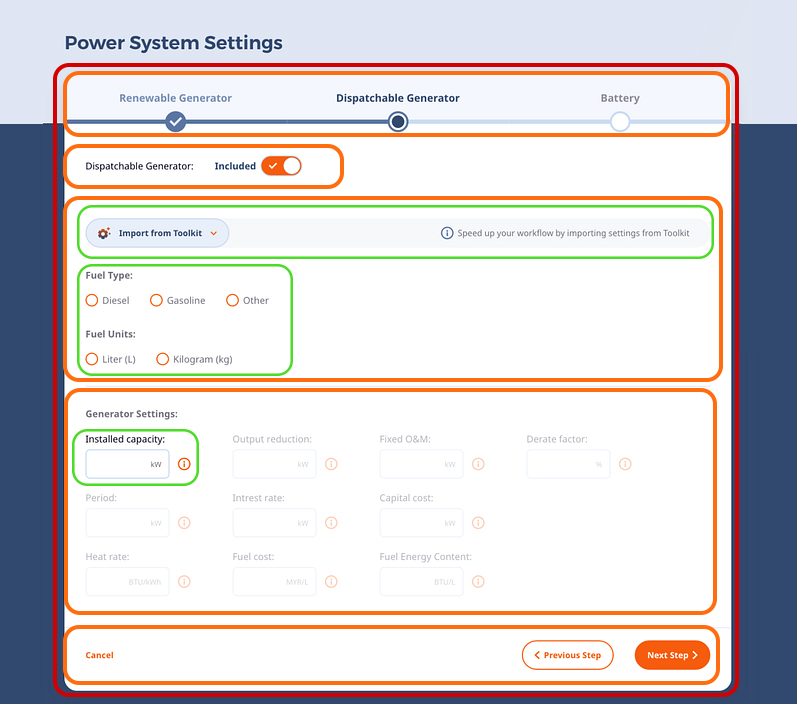
Each color would be its own .tsx file. The idea is to have one .tsx file for the entire
step (Red), five direct child components inside their own .tsx files (Orange), and
three reusable grandchild components inside our child components (Green).
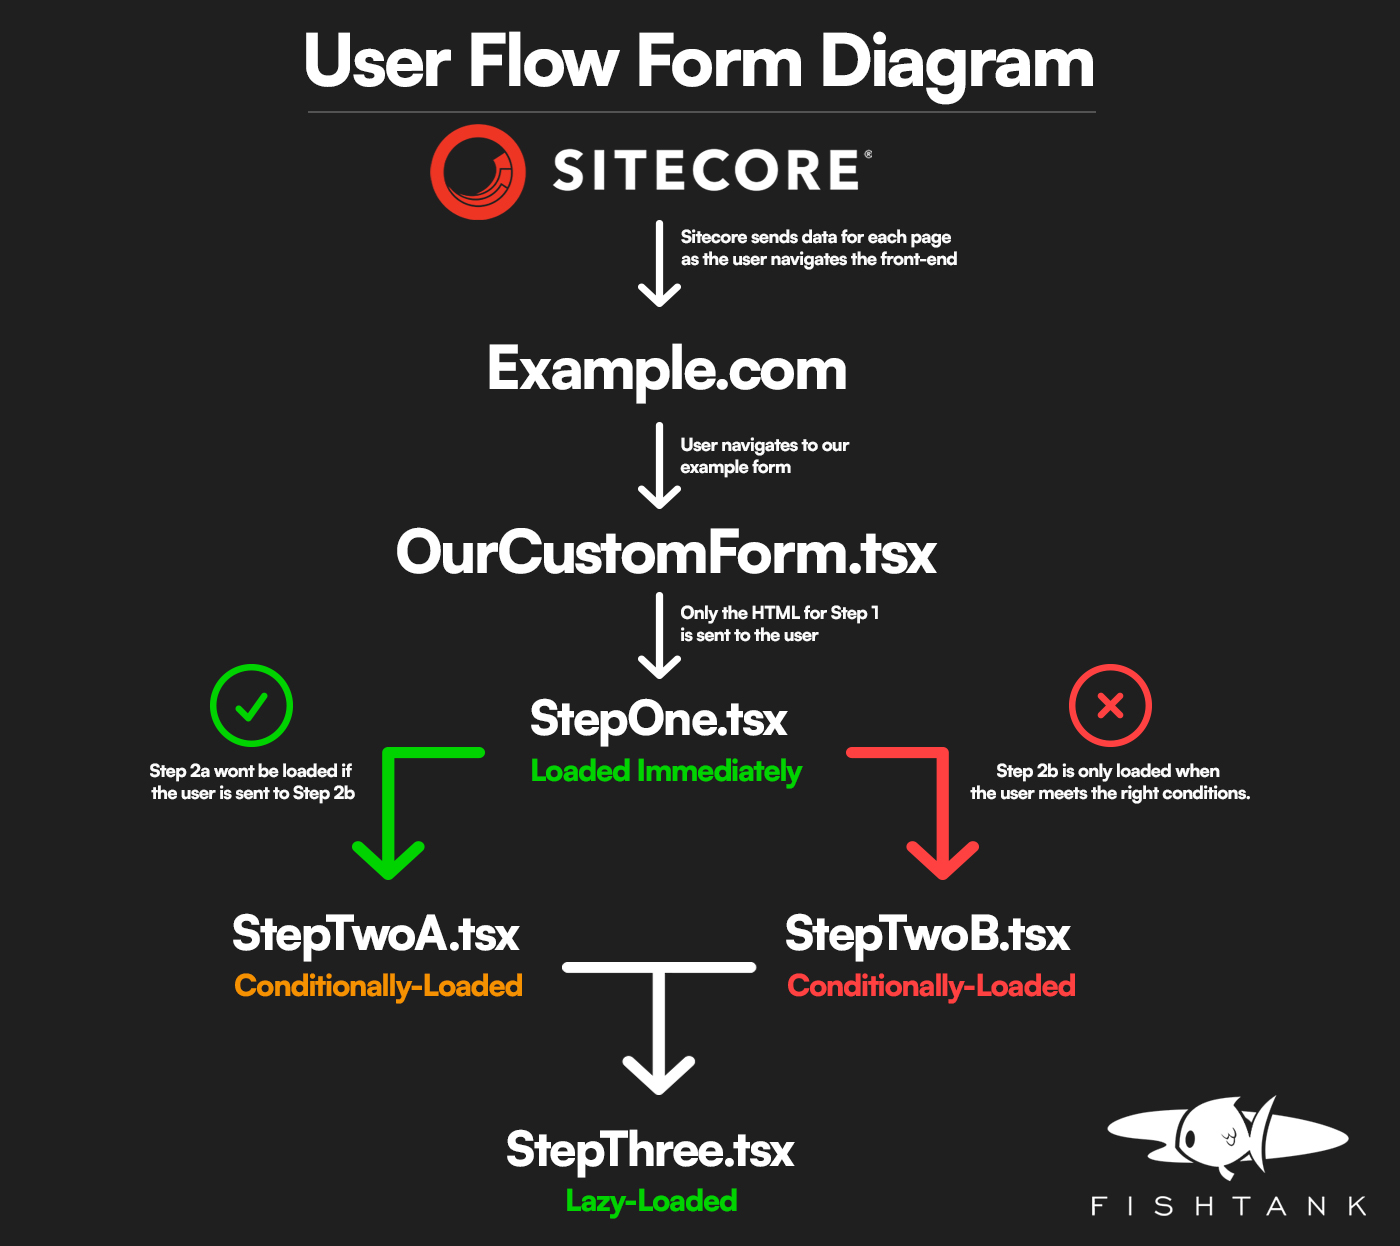
The end goal isn't just creating a better developer experience by splitting your code into multiple manageable files;
this also allows us to easily code-split our work and only provide what's needed to the user. In a larger file, we
could be loading step 4 while the user is working on step 1 — this will increase the time the initial load
takes, which can have an increase in user bounce rate! The optimal solution is to use Next/Dynamic to
lazy load each step to the user only when they need it. Next/Dynamic is a great Next.js out-of-the-box
code-splitting tool, but it has some issues with Sitecore, so be careful when using it.
The initial concept here is to split the code into easy-to-manage chunks; however, that doesn't mean creating multiple renderings in Sitecore. You want your authors' experience to be just as good, if not better, than your developers' experience reading the code. Luckily, these two things go hand in hand. You only need to create one Sitecore rendering, so your authors can have a seamless experience.
We want to have one parent .tsx file that houses all our children—this file will be our single
Sitecore rendering that our authors can drag onto the page inside Experience Editor or Pages. This one file will
obviously contain all our child code, but from the authors' perspective, it's all one neat item.
Experience Editor and Sitecore Pages
Your entire form can (and should) be editable inside Sitecore Pages. It's super easy to build your JSS components with this in mind, so don't make your authors use the Content Editor when they don't need to.
Before you start coding, think about any areas that might cause problems inside the Experience Editor—why are they going to cause a problem? Most of the time, the answer is one of two things:
Luckily, both of these things are easy to work around! If your issue is user interaction, start adding early return
logic that prevents the code from running when inside pageEditing mode, and always display all hidden
parts to the author in Sitecore Pages.
If your issue is a complex design, create a simple conditional render using pageEditing mode that
provides your author with a much simpler version of the design inside Experience Editor compared to what the end
user will see on the front end.
There is no reason your form shouldn't be editable inside Experience Editor or Sitecore Pages.
Code Examples:
//Early return that prevents interaction code from running
const userInteraction = () => {
if (sitecoreContext.pageEditing) return;
...
}

//Complex design with a conditional render
{sitecoreContext.pageEditing ? (
    //Simplified Version for EE/SP
) : (
    ...
)}
The first thing you should build, if you don't already have one, is a reusable formContext hook. If
you've only made less complex forms with fewer than five fields, then you've probably never considered the benefits
of using a dedicated, reusable custom hook for managing your forms.
The traditional way or “brute force” way of making a React form would require you to make a custom state for all your individual inputs. While there isn't anything inherently wrong with doing it that way, you can improve the readability of your code significantly by creating a reusable hook.
The general idea behind a useFormContext hook is to reduce the amount of code inside your
.tsx files and create an easy way to manage form data between different form steps or stages. If your
form has multiple “pages,” then a useFormContext hook will allow you to seamlessly carry
across any valuable data from page to page without needless prop drilling or adding endless extra lines
of code.
Here is some example code, but if you don't fully understand it, or you want to learn how to make a
formContext from scratch, you can read about it here.
const FormContext = createContext<FormContextType | undefined>(undefined);

export const useFormContext = () => {
  const context = useContext(FormContext);
  if (!context) {
    throw new Error('useFormContext must be used within a FormProvider');
  }
  return context;
};

export const FormProvider: React.FC<FormProviderProps> = ({ children }) => {
  const [formData, setFormData] = = useState<formDataType>({
    submissionObject: {
      // Add any default form data here. This Obj will be sent to your API
    },
    otherData: {
      // Add any other data you want to pass around between steps
    },
  });
  const [isSubmitted, setIsSubmitted] = useState(false);
  const [isLoading, setIsLoading] = useState(false);

  const handleSubmit = async (e: React.FormEvent<HTMLFormElement>) => {
   //... handleSubmit code
  };

  return (
    <FormContext.Provider value={{ formData, setFormData, handleSubmit, isSubmitted, isLoading }}>
      {children}
    </FormContext.Provider>
  );
};
Again, if you don't understand what this code is doing or how to utilize it, you should learn
more about it before continuing in this blog since the concepts are going to heavily rely on the
FormContext concept/structure used in that blog.
The Future of React Forms: React 19
There are multiple new hooks coming with React 19, like
useFormStatus and useFormState, that will make working with forms significantly easier in
the future. useFormStatus is for directly managing the status of form fields, validation, and
submission states. useFormState will be used to efficiently monitor and modify the values of inputs.
Once Sitecore adds React 19 functionality to JSS, creating forms will evolve once again!
This is where you actually get to start coding! I know, we’ve had walls of text until now, but this is where we start applying the overarching layout directly into our solution. You should create a single new parent file inside your primary components folder, then inside your secondary components folder, you can start dividing up all the individual steps.
The important part is to correctly isolate the parts of the form we highlighted in step 1 when we were dissecting the design. Obviously, every project has its own standards for organization, but here is a simple example that should be a visual representation of how we want to dissect each section of the form.
├── src/
│   ├── components/
│   │   ├── OurComplexForm.tsx
│   │   └── ...
│   │
│   ├── component-children/
│   │   │
│   │   ├── OurComplexForm
│   │   │   ├── OcfStepOne
│   │   │   │   ├── Components
│   │   │   │   └── OcfStepOne.tsx
│   │   │   ├── OcfStepTwo
│   │   │   ├── OcfStepThree
How to Structure the Parent .tsx File
There are two important things you need to do when configuring your top-level Parent.tsx file:
useFormContext hook we just built.Configuring the useFormContext hook is extremely simple. We just need to wrap our return in a context provider. If you followed the guide I linked to
above, this will be named FormProvider. We can take our FormProvider and create two
components inside our Parent.tsx file: one component just for our FormProvider, and
another for the body of the form. This separation should help with general code readability.
//The Component for Just the FormProvider
const OurComplexForm = (props: OurComplexFormProps) => {
  return (
    <FormProvider>
      <FormBody {...props} />
    </FormProvider>
  );
};
The next block of code will import the formData from the useFormContext() and add a data-component label for improving the debugging experience. Remember, both of these components should be inside the same
Parent.tsx file. Just because you can put new components into their own files, doesn't always mean you
should.
const FormBody = (props: OurComplexFormProps) => {
  const { formData, setFormData } = useFormContext();
  const { sitecoreContext } = useSitecoreContext(); //Dont forget about making the form editable inside EE & Pages

  return (
    <div data-component="OurComplexForm" className="">
      {/* Form Body Content goes here! */}
    </div>
  );
};
The final step is to handle switching between form stages. This is super easy to do and will allow us to reduce the page size for the end user with code splitting.
We can use simple query strings to navigate the user between steps. If the query string says step 1, then the user is
directed to step 1. I can already hear you asking, “Why not navigate the user using the
formContext?” and that's a great question with a simple UI/UX answer! I want to provide
the user with the ability to navigate between steps using the back button in their browser. There is nothing more
frustrating than pressing the back button on your mouse on a 5-page form and losing all your progress.
At the end of the day, it doesn't really matter if you use a query string or the useFormContext to
navigate the user between the steps. The following code will still work the same, so make a decision that matches
your business logic.
const [formStage, setFormStage] = useState<stageProps>('2');

//We can use this useEffect to watch the router.query for updates
useEffect(() => {
  //Direct user to correct step
  switch (router.query.stage) {
    case '2':
      setFormStage('2');
      break;
    case '3':
      setFormStage('3');
      break;
    case '4':
      setFormStage('4');
      break;
    default:
      setFormStage('2');
  }
  /* eslint-disable react-hooks/exhaustive-deps */
}, [router.query.stage]); //If youre not using a query string, dont forget to update this

//Add the conditional rendering to our form
return (
  <div data-component="OurComplexForm" className="">
    {/* Step 1 */}
    {formStage === '1' && <OcfStepOne fields={props.fields} />}

    {/* Step 2 */}
    {formStage === '2' && <OcfStepTwo fields={props.fields} />}

    {/* Step 3 */}
    {formStage === '3' && <OcfStepThree fields={props.fields} />}
  </div>
);
As you can see above, we are conditionally rendering each step; however, this raises another problem: what happens if
a user “skips” a step? This is mainly an issue if we are using query strings to navigate
between each step, but it wouldn’t be amiss to implement something similar if you are navigating with the
FormContext. The main issues we are trying to target are:
These are just some of the reasons we want to add “step” level validation. We can do this by
looking at the submissionObject from the FormContext. There are two ways to implement
this: a more complex method and a simpler catch-all method.
Basically, if you want to give the user the best experience, you would check that all the values exist for each of
the previous steps, then redirect the user to the step with the missing data. You can do this by creating a reusable
function that we can call inside a useEffect when each step mounts.
const stepValidation = (submissionObject: submissionObjectType) => {
  //We dont want to redirect someone who's in Sitecore Pages
  if (sitecoreContext.pageEditing) return;

  //Track which stage to send the user back to
  let queryStage = '';

  const isStepOneComplete = Object.keys(submissionObject.stepOne).every((field) => {
    return submissionObject.hasOwnProperty(field);
  });

  ...

  //Start at the last step and work backwards to find the earliest incomplete step
  if (!isStepThreeComplete) queryStage = '3';
  if (!isStepTwoComplete) queryStage = '2';
  if (!isStepOneComplete) queryStage = '1';

  ...

  //if queryStage is empty, the form is valid
  if (queryStage == '') return;

  //Redirect the user to the earliest incomplete step
  //Example using useRouter from Next/Router
  router.replace(
    {
      pathname: (sitecoreContext.itemPath as string).toLowerCase(),
      query: { stage: queryStage },
    },
    undefined,
    { shallow: true }
  );
};
If you want a quicker and simpler level of validation, you can only look for the submission data from the previous step and then redirect the user back to the first step whenever there is an error. The idea is, “If they are missing data from one step, they are probably missing data from others too.” I would only recommend this method for very small forms since it's going to be a negative user experience to be redirected back to step 1 on even a mildly lengthy form.
//Validate the user can be on this step
useEffect(() => {
  //We dont want to redirect someone who's in Sitecore Pages
  if (sitecoreContext.pageEditing) return;

  if (formData?.submissionObject.product) return;
  if (formData?.submissionObject.firstName) return;
  if (formData?.submissionObject.email) return;

  // Send user previous stage if they are missing data
  // Add Redirect Code Here

  /* eslint-disable react-hooks/exhaustive-deps */
}, []);
Okay, so we’ve talked about looking at the data inside the FormContext, but how exactly are you
supposed to set and get said data? Great question, and one we are about to answer!
As I mentioned in the FormContext part of the blog, we have two sections in our
FormContext’s formData:
submissionObject - where our submission data is stored.otherData - where we can store any other data we want to send between steps.Updating these values is simple. We just need to import and call the setFormData value, then make sure
we spread the previous data for both submissionObject and otherData. Congratulations, now
your form data is available in every step!
Updating the formData is really that simple; however, there is one important rule that
you need to make sure you follow. You should only update formData when a major operation is happening
— NOT every time an input is updated. If you update the submissionObject or
otherData when smaller operations happen, then you could end up with some weird component re-rendering
bugs that are hard to handle. Some examples of major operations would be:
submissionObject).otherData).Make sure you really think about when you are updating the formData, and ask yourself: Will
updating this now affect anything else?
You can create a local state to store all the input data, then when the user clicks “Next,” you can
populate the submissionObject.
⚠️ Only update the formData when the user progresses between steps
setFormData((prevData: formDataType) => ({
  submissionObject: {
      //spread previous data if you we want to keep the current data
    ...prevData.submissionObject,
    ...stepTwoInputData,
  },
  otherData: {
      //spread previous data if you we want to keep the current data
    ...prevData.otherData,
  },
}));
Step navigation is pretty simple and something that's already been mentioned in the validation section, but I want to cover it directly to make sure you fully understand how it works.
Query String:
If you’re navigating the form using a query string, then you can use Next/Router to update the
query string. Sitecore interacts weirdly with Next/Router because of how [[...path]].tsx
handles route changes. Luckily, it's not too difficult to work around; we just need to get the current path from
sitecoreContext.
const { sitecoreContext } = useSitecoreContext();
const router = useRouter();

...

//Example using useRouter from Next/Router
router.replace(
  {
    pathname: (sitecoreContext.itemPath as string).toLowerCase(),
    query: { stage: '1'}, //Ensure you spread query if you are using other query params
  },
  undefined,
  { shallow: true } //This is important, it prevents the page from refreshing but still add a browser history item
);
Form Data:
If you want to navigate your form using the FormContext, then you’ve got it even easier. Just add
a currentStep value to your FormContext and update it when you’re ready for the user
to navigate between the steps!
As I’ve mentioned a few times, there is no reason your large custom form shouldn't be editable inside Experience Editor and Sitecore Pages. I've been dropping hints along the way, but this section is going to be an amalgamation of those so you can easily reference some of the most common pitfalls.
Disable API Calls & useEffect Logic
If you’re calling a custom API to get data values, or running fancy logic (like calculating a total
balance) when a value is changed, you don’t want this code running and affecting Sitecore Pages. We
can get around this by adding an early return into our useEffect and API calls.
useEffect(() => {
  //We dont want to redirect someone who's in Sitecore Pages
  if (sitecoreContext.pageEditing) return;

  //API Call logic
    ...

  /* eslint-disable react-hooks/exhaustive-deps */
}, []);
Use Skeletons for Unloaded API data
Obviously, if you're preventing logic from running (like API calls or total balance calculations), you're going to
have null or empty values all over your form! This isn't the end of the world, but it is going to confuse your
authors. The simple solution to this is to use a loading state anywhere that has missing data.
if (!data) <Skeleton/>
react-loading-skeleton is a great quick npmpackage you can install to add this functionality to your project.

Conditional Renders
You need to make sure that all your conditional renders
include a check for whether the author is editing the page. Here is a perfect example from our
Parent.tsx that we created at the start of the blog.
//Make sure all steps are rendered in Experience Editor & Sitecore Pages
return (
  <div data-component="OurComplexForm" className="">
    {/* Step 1 */}
    {(formStage === '1' || sitecoreContext.pageEditing) && <OcfStepOne fields={props.fields} />}

    {/* Step 2 */}
    {(formStage === '2'|| sitecoreContext.pageEditing) && <OcfStepTwo fields={props.fields} />}

    {/* Step 3 */}
    {(formStage === '3'|| sitecoreContext.pageEditing) && <OcfStepThree fields={props.fields} />}
  </div>
);
Disable All Redirects (Including Your Step Level Validation)
This is the exact same thing as disabling your useEffect logic; the last thing you want is your authors
being redirected to the live site. Make sure you’re adding early returns to all your redirects.
if (sitecoreContext.pageEditing) return;
Create a New Component Just for Sitecore Pages and Experience Editor
Worst case scenario, your design is so complex that the author can't easily edit the content, and you don't want to double or triple the lines of code in the file with an overabundance of conditional renders.
If that's the case, just create a new .tsx file only for Sitecore Pages and transform the design into a
very simple layout. Then add one conditional render, checking if the user is in pageEditing mode.
The final step in handling a complex form is submitting the data to your endpoint. Luckily, we built this
functionality into the FormContext already; all you need to do is pass down the endpoint's URL as a
parameter and display the loading and success states!
const { ..., handleSubmit, isLoading, isSubmitted, results } = useFormContext();

...

handleSubmit('/api/submit');

...

<Button loading={isLoading} ... />

...

useEffect(()=>
    if (!isSubmitted) return;
    if (!results) return;

    //Redirect to success page code here
},[isSubmitted])
Displaying the Response Data From the Submission
Once you’ve got the status 200 value back from your API, you’ll need to know how to display the response
body — or even check if the server sent you an error code! You can use the results variable
inside the FormContext to do this.]
results contains the entire response body from your API call. So if you want to check what the status
code is, or display part of the response body to the user (like a confirmation code), then this is where you would
do it. results will match the exact response from your Next.js serverless function.
I hope this structure will help you architect your complex Sitecore forms. Creating strong, reusable code is important, and since Sitecore has made Next.js the official JSS framework of choice, it's important to understand the concepts behind architecting complex React forms.