Reading time: 4 min read
Working with the New XM Cloud Local Development Setup for Disconnected Offline Mode
A step-by-step guide to setting up Sitecore’s XM Cloud disconnected mode with key changes and troubleshooting tips
Start typing to search...
A step-by-step guide to setting up Sitecore’s XM Cloud disconnected mode with key changes and troubleshooting tips
Let’s walk through the steps of setting up the new XM Cloud Disconnected Offline Mode. There are a number of changes though that we’ll highlight in this article, but the most notable are:
./local-containers/docker.up.ps1 and init.ps1 scripts are located, now positioned under
./local-containers/scripts.
sxastarter was the name of the Next.js rendering project, but now it’s called
nextjs-starter and it’s located under ./headlessapps.
Similar to before, there are a few requirements. Many of which we likely already had, but there are some new ones. It’s possible you’ll also want to be NVM for Windows if you’re running multiple projects. Basic requirements include:
Just like before we need to obtain a copy of the XM Cloud Foundation repo. So let’s perform a
git clone on that now. I like to set it up as a folder just off the root, so I always go back to
cd \ before I run the git clone.
git ,[object Object], ,[object Object],://github.com/sitecorelabs/xmcloud-foundation-head.git project-name
This is by far one of the biggest differences. The entire folder structure has changed. The docker
folder has been moved under local-containers folder. The up.ps1 and init.ps1
PowerShell scripts were moved into ./local-containers/scripts.
The containers in this configuration are set up to utilize the most recent version of Microsoft's LTSC (Long-Term
Servicing Channel) base container. You must edit the ./local-containers/.env file and include the baseOs
argument when running the ./local-containers/scripts/init.ps1 script if your BaseOS is
incompatible.
Before working with the project, you need to initialize the repository. This step sets up the required environment variables and configures the way the application components will interact within the containers. These configurations are essential for ensuring the containers build and run correctly. While the script location has changed, as stated above, their function has largely stayed the same.
To initialize the repository, run the following init.ps1 script from the
./local-containers/scripts/ folder. Make sure to open your terminal with elevated
privileges (Run as Administrator) to avoid permission issues.
To initialize the repository, run the following init.ps1 script from the
./local-containers/scripts/ folder. Make sure to open your terminal with elevated
privileges (Run as Administrator) to avoid permission issues.
./local-containers/scripts/init,[object Object], -InitEnv -LicenseXmlPath ,[object Object], -AdminPassword ,[object Object],
InitEnv: Prepares the environment by setting up the necessary variables.LicenseXmlPath: Path to your Sitecore license file, required to initialize the
Sitecore instance.AdminPassword: Sets the desired password for the admin user in Sitecore. You should
replace "DesiredAdminPassword" with a strong password of your choice.This initialization process ensures that the containers will have access to the right configurations, allowing them to run smoothly.
This is where you may also encounter an antivirus issue that I’ve covered in a another article and show a way to get around this issue.

After init finishes running, you can then run the up command:
./,[object Object],-containers/scripts/up.ps1
This progresses much the same as it previously did. When complete, you’ll be able to login to
https://xmcloud.localhostand once you’ve setup a
Headless Collection and Headless Site inside Sitecore, you’ll be able to access the site via
https://www.nextjs-starter.localhost.
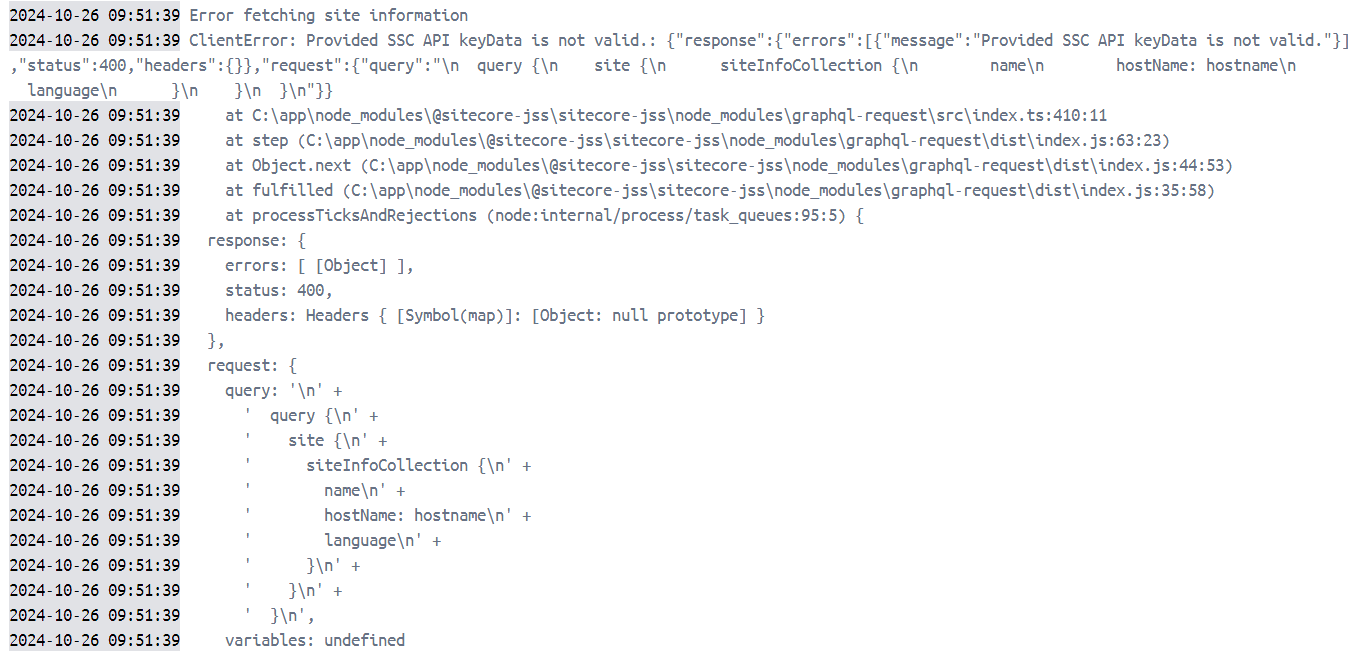
As I mentioned above, I did encounter the issue related to my antivirus identifying the init.ps1 script as malicious. I also encountered an issue where on first load, even after creating a Headless Collection and Headless Site that the front-end app, couldn’t find the site as we discovered in the Docker logs shown below.
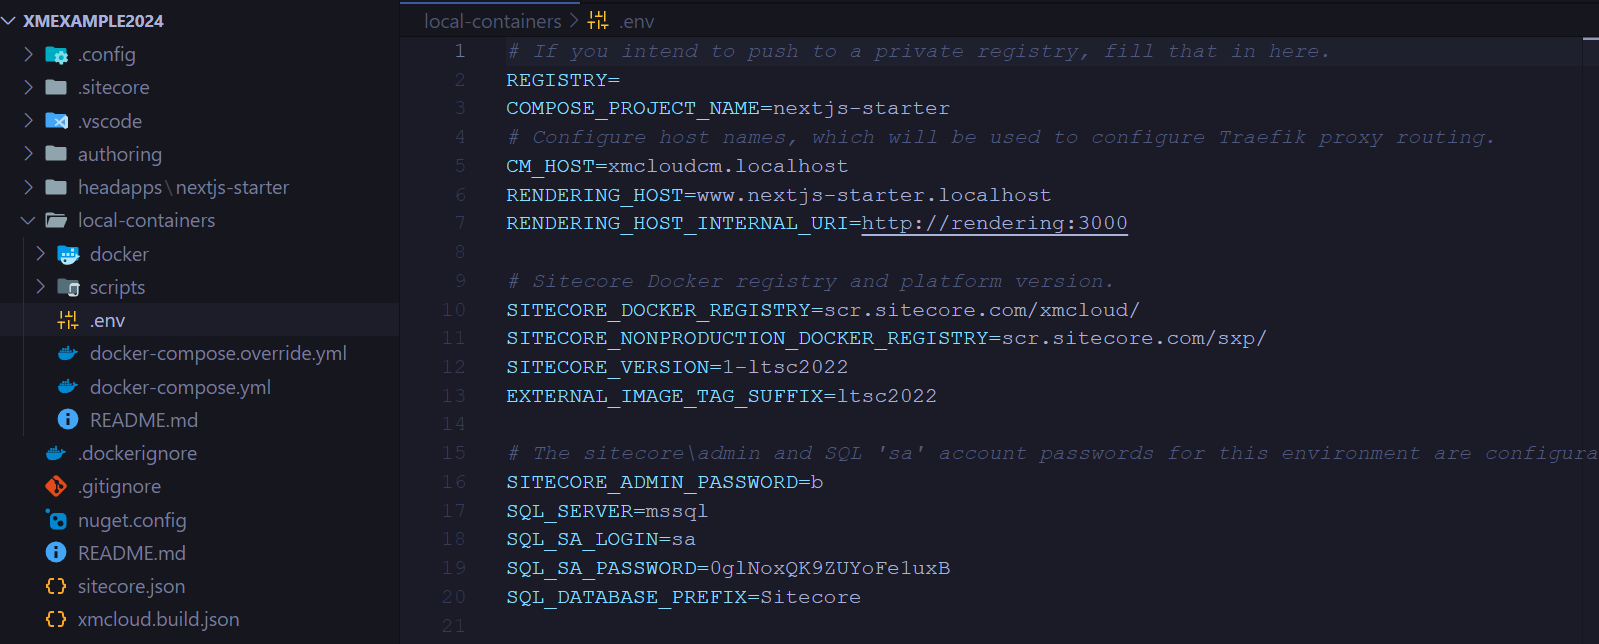
We were able to get the site working by copying the .env file located under
./headlessapps/nextjs-starter, creating a new file called .env.local and updating the
SITECORE_API_KEY there to be the API key found in the root .env file. Restarting the
rendering container then worked and the site displayed. This shouldn’t be required but we suspect it has to do
with the the SITECORE_API_KEY_NEXTJS_STARTER value being set twice in the init.ps1 script
shown below.
###############################
# Generate scjssconfig
###############################
,[object Object],
Set-EnvFileVariable ,[object Object], -Value $xmCloudBuild.renderingHosts.nextjsStarter.jssDeploymentSecret -Path $envFileLocation
,[object Object],
################################
# Generate Sitecore Api Key
################################
,[object Object],
$sitecoreApiKey = (New-Guid).Guid
Set-EnvFileVariable ,[object Object], -Value $sitecoreApiKey -Path $envFileLocation
If I hear back on my inquiry to the Sitecore community, I’ll be sure to update that here.