Sitecore Goal Folders, Categories, Facets, Taxonomies & Assets
What’s The Difference & Which Should You Use?
What’s The Difference & Which Should You Use?
Start typing to search...
If you’ve gone to create a goal before in the Marketing Control Panel, you’ve probably seen a few different folder and taxonomy items that have left you wondering what they do, whether you should use them, and how they’re supposed to be used.
Goal classifications like folders, categories and facets are there to help you segment your goals for reporting, organization and categorization.
You may end up with hundreds of goals over time, which can be impossible to track without proper classification, or you might want to report on how a group of goals is performing, or even trigger personalization to run based on a category of goals. These are all possible thanks to Sitecore's goal classification options.
In this article, I’m going to go over:
I'll be explaining how they differ, how they can be used and what they're meant to be used for. Let’s dive into it.
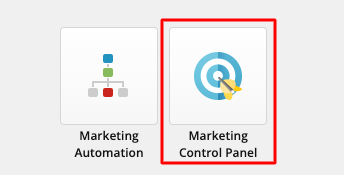
In Sitecore, goals are administered from the Marketing Control Panel. You can access the marketing control panel from the Sitecore launchpad.

You’ll see an item called Goals. This is where you’ll create your goals.
If you expand the Goals node, you’ll see a few goals that Sitecore has added out of the box. You can customize or use these goals, or you can create your own. More on customizing the out of the box goals and creating your own goals in another blog.
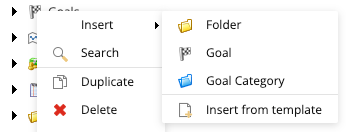
If you right click on Goals > Insert you’ll be met with the following options:

Folders are a way to keep your goals tidy and structured. Sitecore is extremely flexible, so you can use these for whatever purpose makes sense to your organization.
You can also nest as many folders as you need to.
A common use case for goal folders is to separate goals for different countries, or regions.
You can then continue to add folders to further separate your goals, such as by campaign, or by goal type.
When you’re ready to add goals, goal categories, or more folders you can add them the following ways:
If you use Goal Folders, make sure you publish the entire folder when you’re finished. Publishing the goal itself is not enough and you might run into issues when you try to use this goal.
Goal Folders are for organizational purposes only. You can’t use Goal Folders to separate the goals for reporting purposes or for triggering personalization actions.
If you right click on Goals > Insert you’ll see one of the options is to add a ‘Goal Category’.
Goal Categories, much like Goal Folders, are really only for organizational purposes. They’re yet another way of categorizing your goals, and you can use these however you’d like.
I suggest using these to separate goals and goal folders into the digital property or website they belong to. Make sure you give your goal categories a name that reflects the website or digital property you’ll be creating goals for.
Again, when you’re ready to add goals, goal folders, or more categories you can add them the following ways:
You can think of goal facets like tags. They allow you to further filter your goal performance reports by nearly infinite numbers of categories and subcategories that would be useful for reporting or triggering personalization with.
You can also use goal facets to trigger and implement personalization rules based on the type of goal someone’s triggered. Pretty neat!
Goal facets live in the Marketing Control Panel, under Taxonomies.
When you open the Taxonomies node, you’ll see Goal facet 1, Goal facet 2 and Goal facet 3.

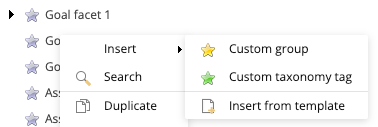
You can’t change the names of these facets, but you can insert an infinite number of custom Taxonomy tags and custom groups below these.
What’s the difference between custom Taxonomy tags and custom groups you might ask? As far as I know there is no real difference. Both serve the same purpose.
To create a new Custom Group or Custom Taxonomy Tag, right click on the Goal Facet you’d like to add it to > Insert > Select either Custom Group or Custom Taxonomy Tag.

When you’ve finished adding Taxonomy Tags and Custom Groups to the Facet, you’ll need to deploy your changes.
To deploy your changes, click on Taxonomy in the top navigation bar, and then click Deploy.
To associate your Goal with a Facet and Taxonomy, select your Goal by expanding the Goals node in the Marketing Control Panel tree.
Click on your Goal, and in the Content window pane to the right, under Classification, you can add any of the goal taxonomy tags that you added under each respective facet.
Note that you can only add one taxonomy tag per goal facet.
When you’ve finished making changes to your goal, make sure you deploy your changes by clicking Save > Deploy, under Review in the top navigation.
Assets are yet another way of categorizing your goals or campaigns for reporting. They are intended to be used so you can report on performance of goals and campaigns for your media items, for example Videos or eBooks.
In the marketing control panel, open Taxonomies.
Right click on Asset > Insert > Asset Group.
Name your asset group a name that describes the group of assets, like Videos.
You can now right click on the Asset Group you just created, and insert additional assets to further categorize your goals and categories.
For example if your asset group is Videos, you might want to further categorize Videos by additional categories like Webinars, Tutorials, Testimonials, etc.
In this case, you’d keep adding assets to the asset group Videos, and naming them based on the category of Video you’d like to report on.
When you’ve finished adding Asset Groups and Assets, click on the Asset node, and in the top navigation bar, visit Taxonomy > Deploy to deploy your changes.
You can now associate your goal with the new asset or asset group that you created.
To associate your Goal with an Asset or Asset Group, select your Goal by expanding the Goals node in the Marketing Control Panel tree.
Click on your Goal, and in the Content window pane to the right, under Classification, you can add any of the Asset Groups or Assets you created, by clicking on the empty bar under Marketing Asset, and selecting the option you want.
Note that you can only associate a Goal with one Asset.
When you’ve finished making changes to your Goal, make sure you deploy your changes by clicking Save > Deploy, under Review in the top navigation.
I hope this guide to Sitecore's different Goal classification options was helpful to you. Please reach out to me if you have any questions about any of Sitecore’s marketing features on Twitter, or LinkedIn, or join my Facebook or LinkedIn groups to ask any Sitecore marketing related questions and get a fast response.