For clients utilizing Cloudflare to cache websites, vastly improving their performance, is almost a no-brainer. You can lower hosting costs, improve responsiveness, and reduce downtime. Who doesn't want that?
When it comes to purging the cache after posting an update, it can sometimes be cumbersome. You'd have to login to the platform, navigate to the purge section and then purge based upon a set of criteria.
What if I told you, we could simplify it to just clicking a Bookmark? And what if I said we could do nearly entirely from within the Cloudflare platform itself?
Let's do this.
Setting Up Cloudflare Workers
If you're using Cloudflare the money is that you're utilizing Workers in some fashion.
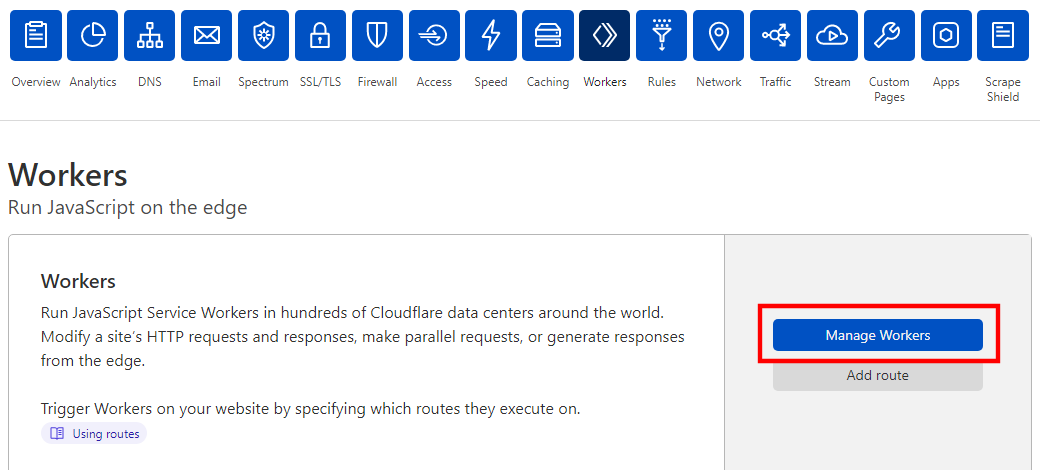
Within Cloudflare, let's navigate to Workers and click Manage Workers.

Once in you can either create a worker or utilize one you already have setup. For the purposes here we're utilizing a fresh, newly minted worker.
Purging Function
Now the Cloudflare API supports purging content in a variety of ways. You can perform based on tags, domains, urls, etc. The way we're doing it is by the URL of the page you're on.
The purge function we'll be utilizing can be broken down into three main parts.
- Obtain and validate the zone Id
- Create the header and data information for purging
- Perform the purge call
async function purgeCache(request) {

    const url = new URL(request.url)
    const { host, pathname, searchParams } = new URL(url)

    // 1. Validate the zone id, and return an error if invalid
    let zoneIdValidated = (new RegExp("^([a-z0-9]{32})$")).test(url.searchParams.get('zone'));

    if (!zoneIdValidated) {
        return new Response('Invalid Zone ID', {
            status: 500
        });
    }

    // 2. Create header information and Json content
    let content = '{"files":["https://' + host + pathname + '"]}'
    let headers = {
        'Content-Type': 'application/json',
        'X-Auth-Email': '[email protected]',
        'X-Auth-Key': 'API Key'
    }

    const init = {
        method: 'POST',
        headers: headers,
        body: content
    }

    // 3. Fetch Purge
    const response = await fetch('https://api.cloudflare.com/client/v4/zones/'+url.searchParams.get('zone')+'/purge_cache', init)

    return response
}
That's the purge itself. We also need to update the primary listener such that it only runs when we want it to.
Update Listener
addEventListener('fetch', function(event) {
    const { request } = event
    const url = new URL(event.request.url)
    if (url.searchParams.get('__purge_page_cache')) {
        event.respondWith(purgeCache(event.request))
    } else{
        event.respondWith(handleRequest(request).catch(handleError))
    }
  })
With this now in place, if we were to go to the following url we could purge the corresponding URL: https://www.ourwebsite.com?__purge_page_cache=1&zone=1234567890987654321. Give it a test using the Worker debug panel before you Save & Deploy to ensure everything is correct.
The Bookmark
Now with the code in place, saved, deployed we can create a bookmark in the browser of our choice. Go on and create a new bookmark, and then Edit it.
In the path portion, you'll want to update it with the following code:
javascript:(function() {s = window.location.toString(); s = s.substring(0,s.indexOf('?'));window.location=s + '?__purge_cache=1&zone=YOUR_ZONE_ID_GOES_HERE';})()
Now, if you're browsing your site that is cached in Cloudflare, you can just hit this bookmark button and it will cause the worker to push a purge request on the page that you're browsing.
When it does, you'll get a response that resembles the following:
{
    "result": {
        "id": "89951414b5da082717fc508ed83f5e8c"
    },
    "success": true,
    "errors": [],
    "messages": []
}
Now, clearing the cache of any of the pages you're on, including CSS, JS, or images that you want to open in a separate browser tab. Couldn't be easier.


