As of
Sitecore 9.0.2, Solr is a supported search technology for the
Azure PaaS deployments. Celebrate.
But as Solr is not a native Azure offering, there is a lot of ways to set it up. There are managed Solr hosting options, 3rd party solr options in the Azure marketplace and customized IaaS Solr VMs.
I'm biased, but all considering **I think** I've found my personal favorite. A very easy & hopefully sustainable way to get Solr running on Azure as an App Service.
(Edit: Dec 12, 2018: As people have shown interest, it's important to note that this is still early days. We still need time and experience to codify this approach and understand it's pitfalls. Thanks to Pete Navarra for digging into this from the jump.)
Why run Solr as an App Service?
Here's the upside as I see it, to pursuing this path:
- Gain all the benefits of an Azure App Service (of course)
- Solr instance is scalable
- Easier to control cost by multiple sizing and scaling options
- Built-in SSL certificate
- Very easy install
- Run it in more regions
- No VM required
- Keep everything as App Services
I could go on. A big driver for me is not having another VM to deal with. I don't want to blend PaaS with IaaS. I want have all the benefits of Azure App Services and I want my environment (and thus my deployments) to be as homogenous as possible.
The Expression Instructions
I've created a
package to download that includes Solr 6.6.2 and the secret-sauce *web.config* ready for deployment. If you create a windows App Service, enabled Java 8, end the Jetty web container and deploy the contents of this zip to the web root you'll have a working Solr search server, ready for Sitecore, running as an App Service.
Installing Solr as an App Service
What we're going to do here is create an App Service, deploy Solr binaries to the machine, then configure IIS to start the Solr server and also pass through all requests to the Solr server. Let us begin.
Step 1: Setting up the App Service
Navigate to your App Service resources and choose to *Add* one. Select a standard *Web App*. Click *Create*.
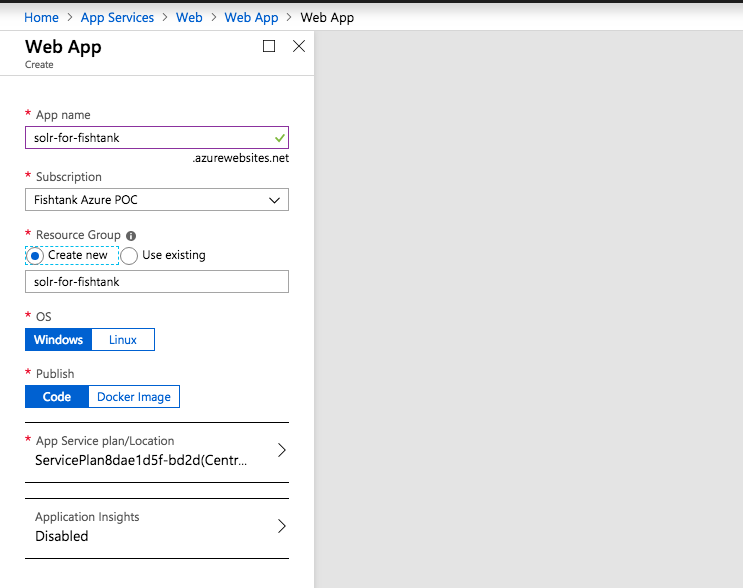
Simply, enter a name of the App Service. Even though we're using Solr, we're going to select Windows here. Let's keep it in the family. The URL of this Solr server will be *solr-for-fishtank.azurewebsites.net* Click *Create*.
Once complete, navigate to your App Services blade / section. Select the new minted App Service (in our case "solr-for-fishtank"). Scroll down the left pane to *Application Settings* and configure your App Service to reflect the settings below:

Notably we've selected:
- *Java version: Java 8*
- *Java minor version: Latest*
- *Java web container: Jetty (Latest)*.
- *Always On: On*
One last item - I made sure FTP/FTPS was enabled as we'll be using that in a moment (but it's optional).
Click *Save*
Step 2: Download Solr
This stage is pretty easy. We're going to download a Solr distribution, unzip it, add a secret sauce web.config to the its root, then deploy it to our App Service.
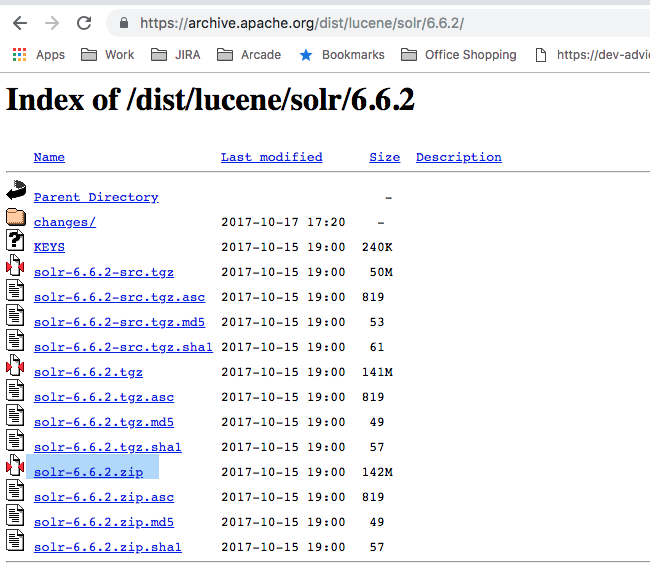
Search Google for your targeted version of Solr e.g. *solr dist 6.6.2*. I like 6.6.2 myself. You'll find yourself at a URL like *https://archive.apache.org/dist/lucene/solr/6.6.2/* and download the
solr-6.6.2.zip.
Next, unzip that Solr package and and add a *web.config* with this contents to the root.
~~~
<system.webserver>
</system.webserver>
~~~
And then we'll have something that looks like so:
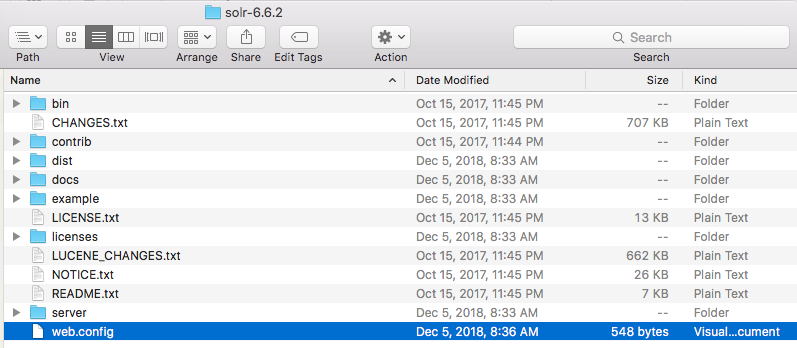
We have all Solr and our little extra web.config ready to go.
Step 3: The Deployment
For our final step, we need to get this collection of files deployed to the web root of the App Service. And for good measure, restart the App Service and confirm Solr is running.
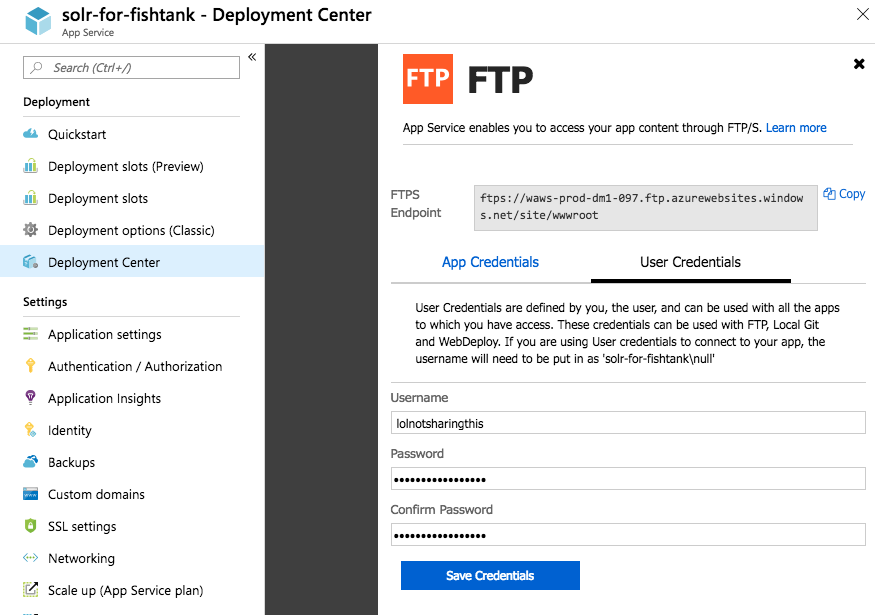
Under *Deployment Center*, pick your poison. I'm choosing FTP to turn this App Service into a Sitecore-loving Solr search server, but that may not be the simplest way. You could use a GIT Repo deploy, create a Web Deploy Package or do a ZipDeploy using the Azure Kudu API.
Use App Credentials or use your existing User Credentials to log into the FTP address provided by Azure.
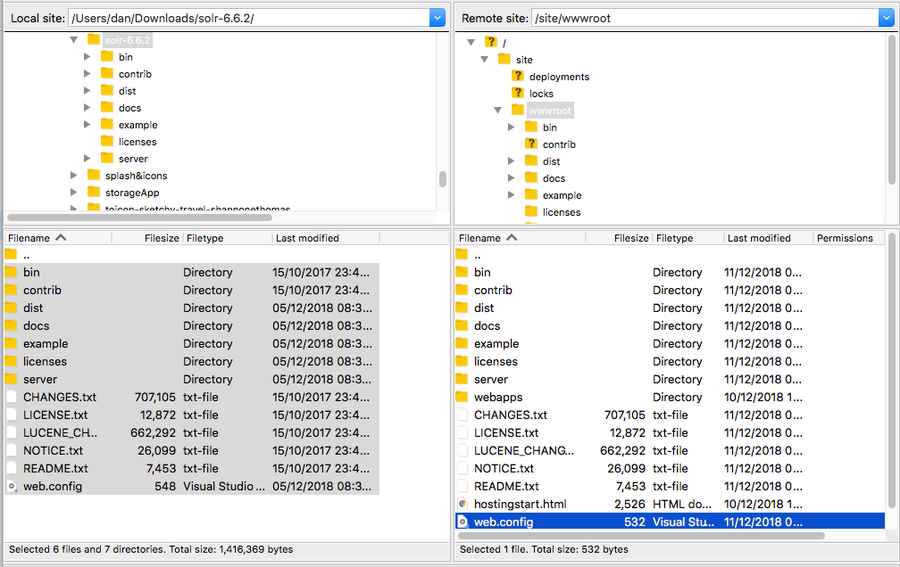
Make sure you've uploaded all the files into the App Service web root at */site/wwwroot*.
Now go back and restart your App Service.
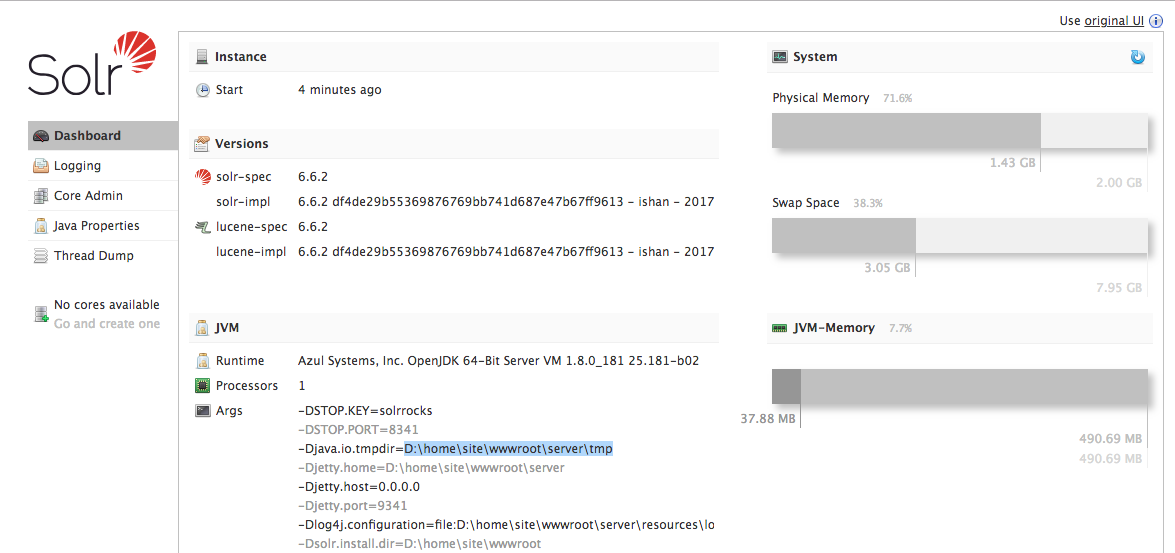
And now when I browse to *https://solr-for-fishtank.azurewebsites.net/solr* I can see that Solr is up and running, waiting for Sitecore… on an App Service!
Step 4: Celebrate
This processes simplifies getting Solr running in
Sitecore Azure PaaS to a standard deploy or file upload. It uses a real SSL certificate, not a fake self-signed one. It's scalable in both power and price. And with a wee bit of effort, the approach can easily be integrated into an ARM template for 100% automated deployments.
Things to note:
- This is running on port 443 (HTTPS) and 80 (HTTP) right now. Please update your Sitecore deploy configs appropriately.
- You could run it under port "8983" but you'd have to poke some holes. We're leveraging the default App Service ports. Isn't a need to change it.
- There is still work to do to figure out how this approach stacks up to more traditional ways of deploying Solr.
I hope you found this helpful. You can find me on Twitter
@dancruickshank. Thanks!
 Simply, enter a name of the App Service. Even though we're using Solr, we're going to select Windows here. Let's keep it in the family. The URL of this Solr server will be *solr-for-fishtank.azurewebsites.net* Click *Create*.
Once complete, navigate to your App Services blade / section. Select the new minted App Service (in our case "solr-for-fishtank"). Scroll down the left pane to *Application Settings* and configure your App Service to reflect the settings below:
 Notably we've selected:
- *Java version: Java 8*
- *Java minor version: Latest*
- *Java web container: Jetty (Latest)*.
- *Always On: On*
One last item - I made sure FTP/FTPS was enabled as we'll be using that in a moment (but it's optional).
Click *Save*
 Search Google for your targeted version of Solr e.g. *solr dist 6.6.2*. I like 6.6.2 myself. You'll find yourself at a URL like *https://archive.apache.org/dist/lucene/solr/6.6.2/* and download the solr-6.6.2.zip.
Next, unzip that Solr package and and add a *web.config* with this contents to the root.
~~~
 We have all Solr and our little extra web.config ready to go.
 Under *Deployment Center*, pick your poison. I'm choosing FTP to turn this App Service into a Sitecore-loving Solr search server, but that may not be the simplest way. You could use a GIT Repo deploy, create a Web Deploy Package or do a ZipDeploy using the Azure Kudu API.
Use App Credentials or use your existing User Credentials to log into the FTP address provided by Azure.
 Make sure you've uploaded all the files into the App Service web root at */site/wwwroot*.
Now go back and restart your App Service.
 And now when I browse to *https://solr-for-fishtank.azurewebsites.net/solr* I can see that Solr is up and running, waiting for Sitecore… on an App Service!