Unlock Seamless Authentication: Integrating NextAuth with Sitecore Headless - Part 3 of 3
Master the art of middleware to secure and streamline your member-exclusive content
Start typing to search...
This is the third part of our journey to mastering NextAuth with Sitecore Headless! So far, we’ve established a solid foundation with configuring NextAuth in Part 1 and crafted a login form that interacts with the configuration in Part 2. Now, it’s time to ensure a smooth navigation experience for users when accessing a authentication required page.
In this blog, we’ll dive into developing a custom middleware that will route users to the right destination based on their authentication status. Whether it’s protecting sensitive pages, redirecting unauthenticated users to login screen, or guiding logged-in users to their appropriate destination, this middleware will play crucial part in the user journey. Missed the earlier parts? Start with Part 1 and explore Part 2 to ensure you’re fully prepared.
We’ll focus on the following:
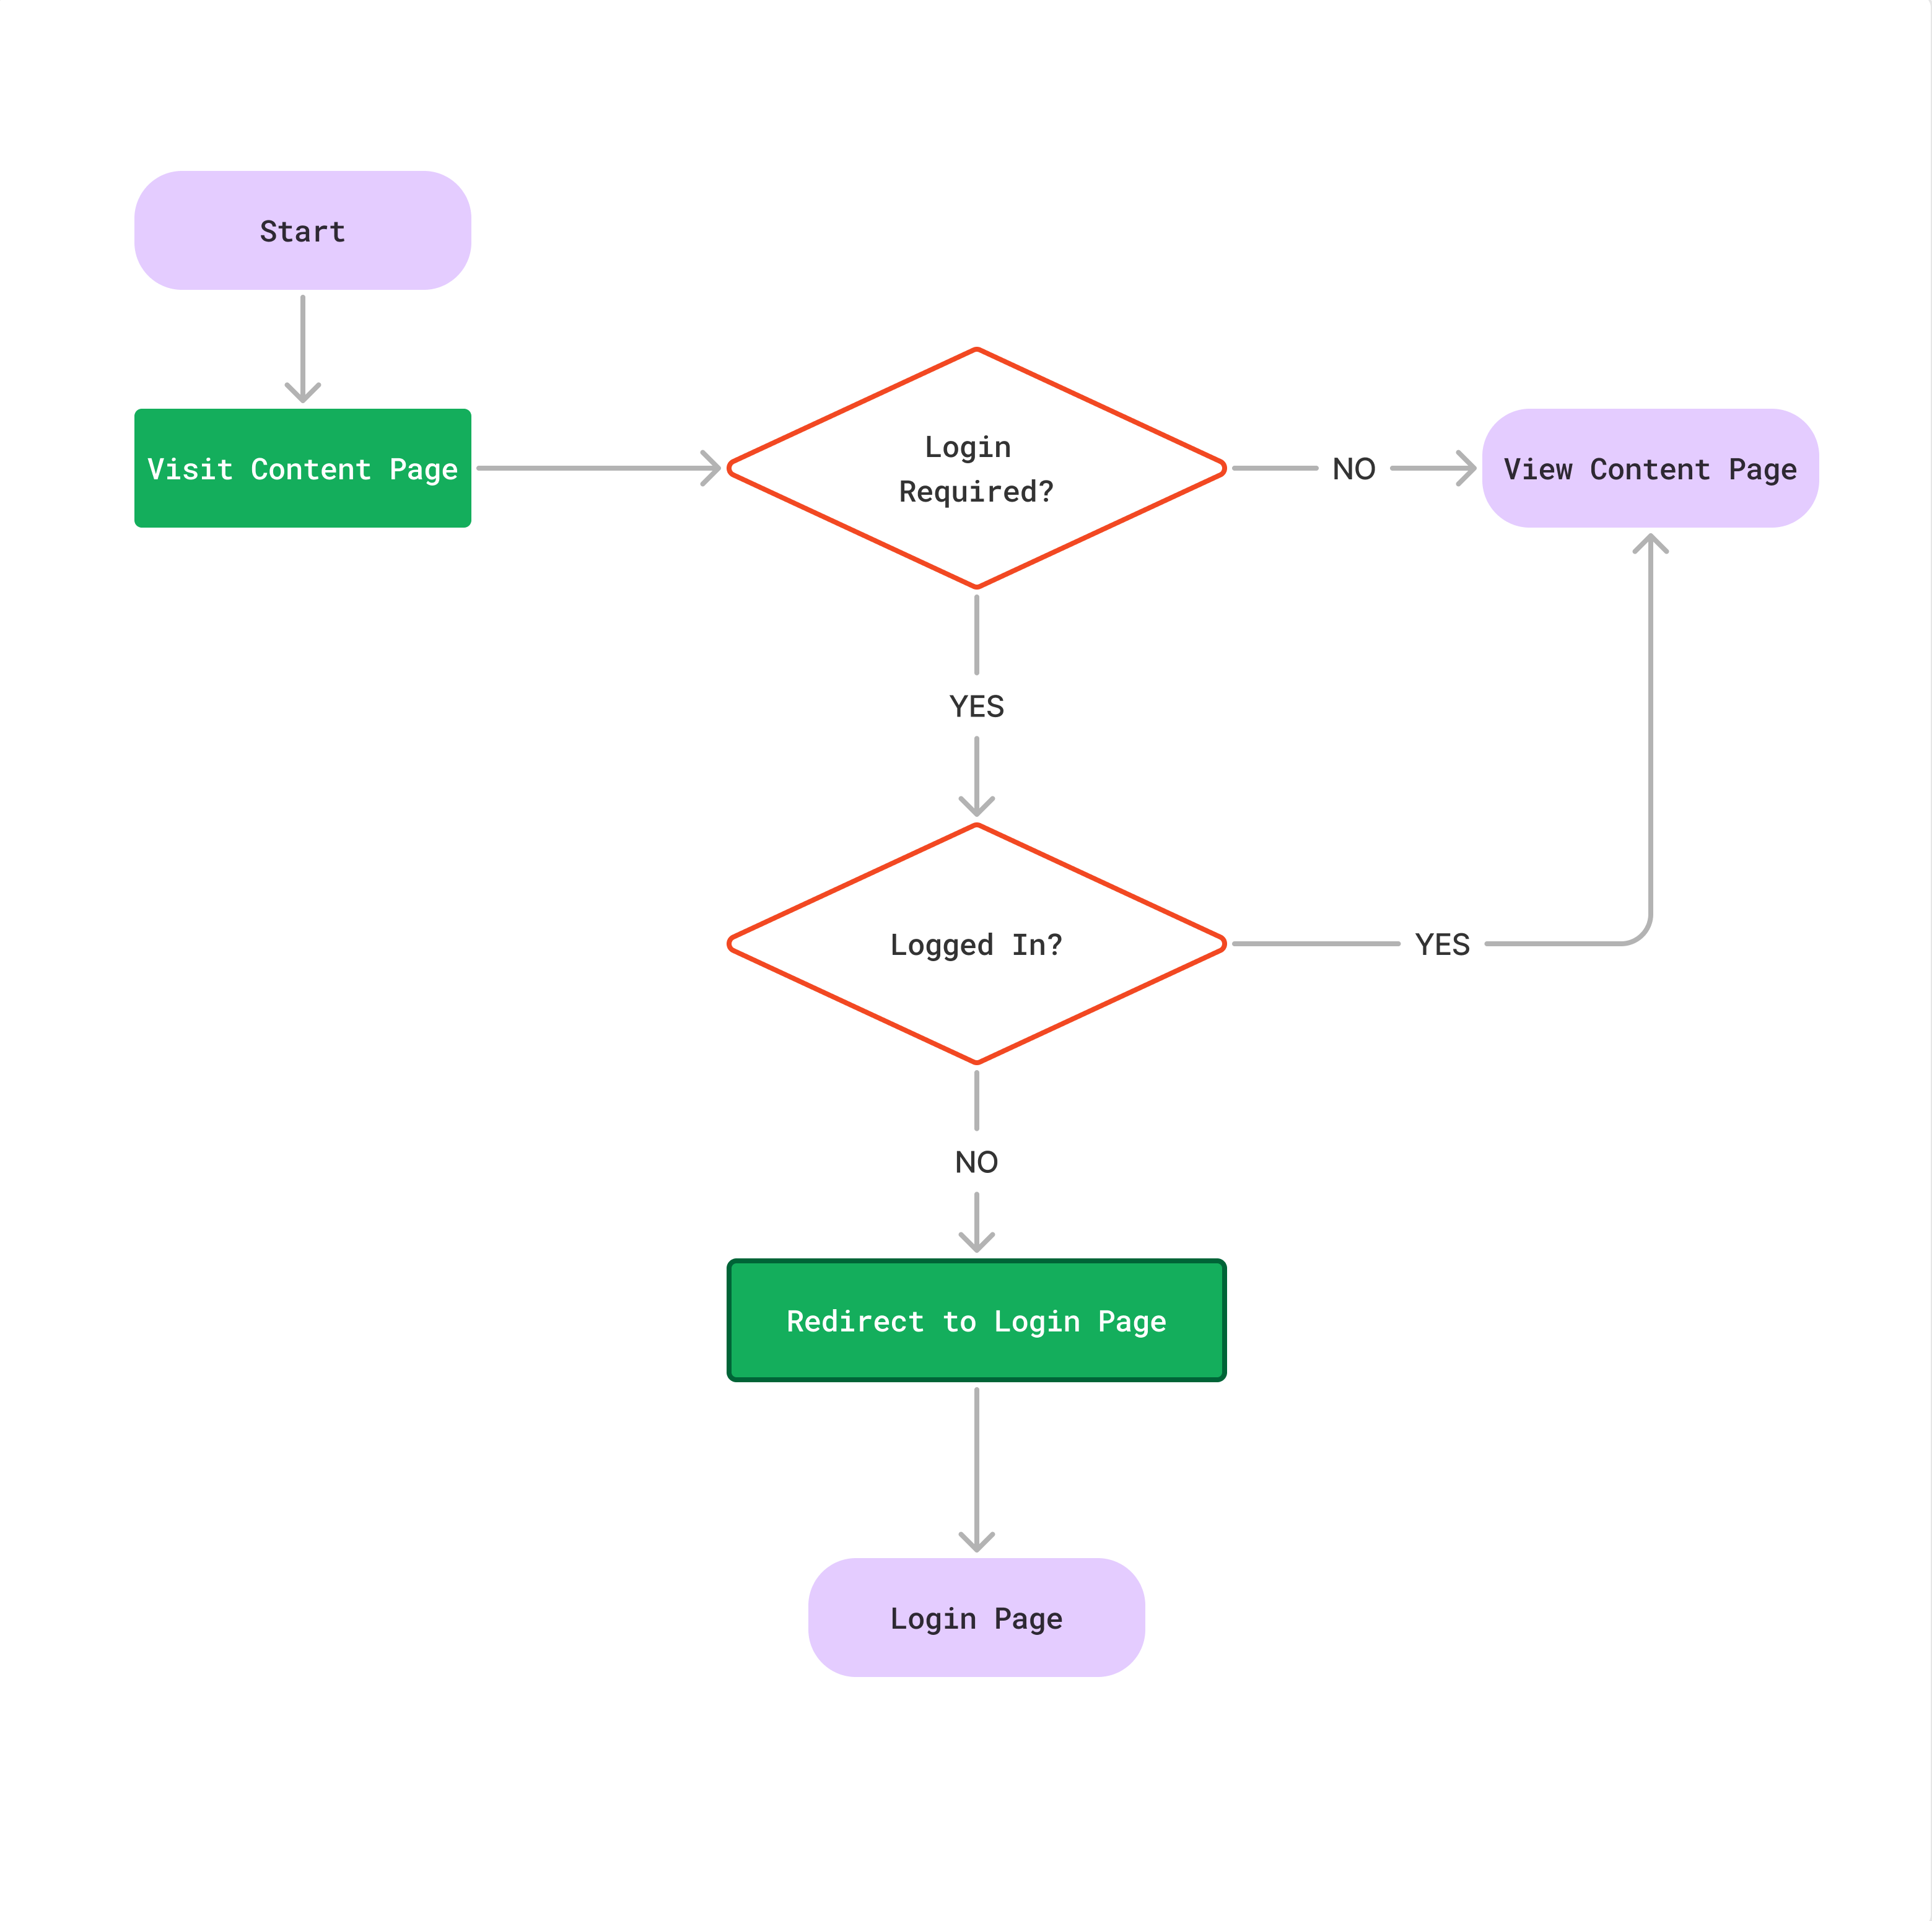
Before we go ahead, below is a what we’re aiming to achieve in terms of user flow.

Again, we’re taking a Sitecore first approach. As mentioned in previous article, it totally depends upon on you whether you want to do Sitecore first or code first. The same logic applies here as well about having clarity around what field the pages will be tagged with.
In order for the headless app to identify whether a page requires login or not, we’ll need to add a field that will be used to determine if authentication is needed. To do, simply add a checkbox field to the existing page template. However, it’s better to create a separate template containing the field and then inheriting it onto the content page template. This way if you have multiple page templates, then all you have to do is inherit the newly created login template to all the page templates.
| Sitecore Item | Description |
|---|---|
| Login OR Authentication | Name of the template. |
| Login Settings or Authentication Settings | Field section. |
| loginRequired | Field with checkbox type. |
Since this is equivalent to a base template change for your site, be patient. Once its done, you should see a new field section with your new field. Simply check the box and publish the content. The middleware will have logic that’ll use the field in order to handle the user flow.
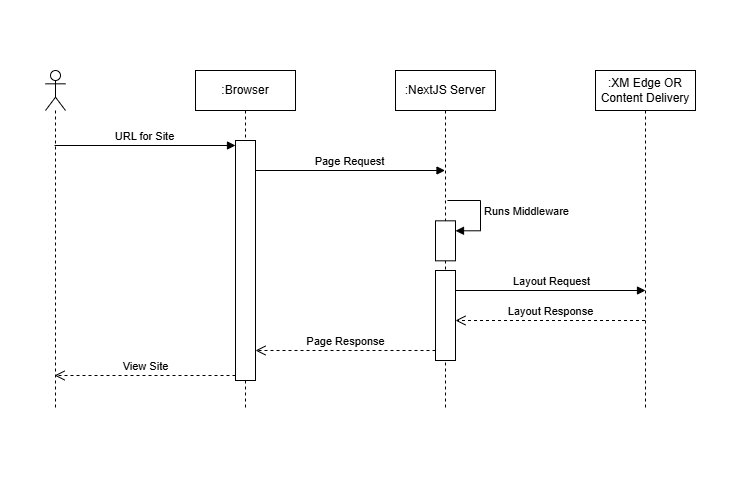
This is where things get interesting. In order to build the middleware we’ll have first understand how a page request is processed.

This is a simple sequence diagram which helps us understand how a request is processed. Notice how on every page request, the middleware is executed first and then the layout data is fetched. This is crucial information as when we’ll write our middleware we won’t have layout data information available in order to verify whether the page is an authentication required page or not. The advantage of using middleware is that it allows us to modify the response. Instead of letting users access a page that requires login, we can redirect them to the login page if they are not logged in. When developing the middleware keep in mind the initial flow chart.
As mentioned earlier, we’ll need to get the layout data first and then we can check whether
the page needs authentication. Hence, we’ll create a function first that takes care of
fetching the layout data called fetchLayoutData.
Note: We’re using GraphQL for fetching layout data.
// GraphQL call to fetch the layout data for the page
const fetchLayoutData = async (sitecorePath: string, sitecoreLanguage: string): Promise<any> => {
  const graphQLUrl = process.env.GRAPH_QL_ENDPOINT;
  const sc_apikey = process.env.SITECORE_API_KEY;


  const graphQLClient = new GraphQLClient(graphQLUrl, {
    fetch,
  });
  graphQLClient.setHeader('sc_apikey', sc_apikey);


  const query = gql`
    query {
      layout(
        site: "<SITE_NAME>"
        routePath: "${sitecorePath}"
        language: "${sitecoreLanguage}"
      ) {
        item {
          rendered
        }
      }
    }
  `;


  const data = await graphQLClient.request(query);
  return data;
};
Now, we’ll use this fetchLayoutData and develop our middleware. Following is
our code.
// src/rendering/src/middleware.ts

import { NextRequest, NextFetchEvent } from 'next/server';
import { NextResponse } from 'next/server';
import { gql, GraphQLClient } from 'graphql-request';
import middleware from 'lib/middleware';
import { Session } from 'next-auth';

export default async function (req: NextRequest, ev: NextFetchEvent) {

  let session: Session;

  //Page and Language for layout call
  const sitecorePath = req.nextUrl.pathname;
  const sitecoreLanguage = req.nextUrl.locale;

  //Layout call
  const layoutData = await fetchLayoutData(sitecorePath, sitecoreLanguage);
  const route = layoutData?.layout?.item?.rendered?.sitecore?.route;
  const loginRequired = route?.fields?.['Login Required to Access']?.['value'];

  //Early return if page does NOT require authentication
  if (!loginRequired) {
    return middleware(req, ev);
  }

  //Get a session by passing in the header
  try {
    const resSession = await fetch(process.env.NEXTAUTH_URL_INTERNAL + '/api/auth/session', {
      method: 'GET',
      headers: {
        ...Object.fromEntries(req.headers),
      },
    });

    if (!resSession.ok) {
      throw new Error(`HTTP error! status: ${resSession.status}`);
    }

    session = await resSession.json();
  } catch (error) {
    session = null;
    console.error('Error fetching session:', error);
  }

  //Redirect to login page and set a cookie for returnUrl
  if (Object.keys(session)?.length === 0) {
    const res =  NextResponse.redirect(new URL('/login', req.url))
    res.cookies.set('loginCallBack', new URL(req.url).pathname);

    return res;
  }

  return middleware(req, ev);
}

//ADD THE fetchLayoutData FUNCTION

export const config = {
  /*
   * Match all paths except for:
   * 1. /api routes
   * 2. /_next (Next.js internals)
   * 3. /sitecore/api (Sitecore API routes)
   * 4. /- (Sitecore media)
   * 5. /healthz (Health check)
   * 6. all root files inside /public
   */
  matcher: [
    '/',
    '/((?!api/|_next/|healthz|sitecore/api/|-/|favicon.ico|sc_logo.svg).*)',
  ],
};
The important part in the above code is to set a cookie which will be used as a returnUrl
after the user successfully logs in. This will facilitate if a user tries to access protected
pages (https://www.<your-site>.com/protected) and they’re not logged in,
then they’ll be redirected to sign in. After successful sign in, they will be redirected
back to /protected. This is why we didn’t use NextAuth’s callbackUrl for
the redirect.
We’ll need to modify the LoginForm.tsx we wrote in Part 2 to utilize the
cookie. Before that, we’ll write some helper functions that can read and delete cookies for
us. To keep the code clean, we’ll define them outside of the form.
// src/utils/Cookie.ts


//Function to read cookie
export function getCookie(name: string): string {
  let matches = document.cookie.match(
    new RegExp('(?:^|; )' + name.replace(/([\.$?*|{}\(\)\[\]\\\/\+^])/g, '\\$1') + '=([^;]*)')
  );
  return matches ? decodeURIComponent(matches[1]) : undefined;
}


//Function to delete cookie
export function removeCookie(name: string) {
  document.cookie = `${name}=; Max-Age=0; path=/;`;
}
Let’s use the helper function along with the cookie set by middleware in our form now.
// src/components/forms/authentication/LoginForm.tsx


//Only need to modify the useEffect but don't forget to import the helper functions


useEffect(() => {
  if (session && status === "authenticated") {
    const callbackPath = getCookie('loginCallBack');


    if (!callbackPath) {
      router.replace('/'); //Redirect to homepage if not cookie found
    } else {
      removeCookie('loginCallBack'); // Clear the loginCallBack cookie
      router.replace(callbackPath);
    }
  }
}, [session, status]);
One major advantage of handling user flow like this is that the prefetch for any authenticated page will return 307 if the user is not signed in. So even if a user is tech savvy, they won’t be able to get the content from the dev tools which providers content security.

The biggest downside of the middleware is the layout call will be made for all pages even if we know certain pages would never require authentication like the homepage. In order to overcome this issue we can add a list of URLs that will be skipped from the layout fetch request. Modify the middleware like below.
// src/rendering/src/middleware.ts

import { NextRequest, NextFetchEvent } from 'next/server';
...

const publicPages = [
  '/',
  '/search',
  '/login',
  // Add pages that DO NOT require authentication
];

export default async function (req: NextRequest, ev: NextFetchEvent) {
  let session: Session;

  //Page and Language for layout call
  const sitecorePath = req.nextUrl.pathname;
  const sitecoreLanguage = req.nextUrl.locale;

  // Verifies if it is a publicPage
  const isPublicPage = publicPages.includes(sitecorePath);

  //Early return if its a publicPage
  if (isPublicPage) {
    return middleware(req, ev);
  }

  //Layout call
  const layoutData = await fetchLayoutData(sitecorePath, sitecoreLanguage);
  const route = layoutData?.layout?.item?.rendered?.sitecore?.route;
  const loginRequired = route?.fields?.['Login Required to Access']?.['value'];

  ...
}
By doing the above, we’re eliminating unnecessary layout requests for the public pages and making the custom middleware more efficient. If you want to go above and beyond, then you can make this middleware as a custom plugin as well. You can read our blog on setting up middleware plugin in NextJS if you’re interested in it.
That’s it folks! This was the final blog for our series where we created a seamless and secure user flow for member functionality. Starting with tagging pages with login requirements, we set the foundation for defining access rules for the pages. Then, we built a middleware to handle the user flow, ensuring users are routed appropriated based on their authentication status. Finally, we focused on optimizing the middleware, which made sure it performs efficiently without comprising content security. With these steps, your Next.js and Sitecore Headless application is now equipped to handle complex user flows with precision and scalability. We’ll have one more blog on JWT tokens and session management so don’t forget to subscribe to our snack newsletter.