Reading time: 7 min read
Designing Responsive Components in Headless Sitecore with Next.js for any Container
Learn how to develop your component to be flexible depending on it’s container
Start typing to search...
Learn how to develop your component to be flexible depending on it’s container
Every developer hopes that once a component is complete, it will require little to no updates. However, this is often not the case. Reusability can be compromised by vague styling requirements that weren’t clearly defined at the start of development, or by new business requirements introduced later in the process. While we often push back on unnecessary changes, it's inevitable that compromises must be made, leading to occasional updates.
When introducing a new variation to a component, we have three main options to consider:
We often consider Sitecore Variants or introducing an entirely new Sitecore rendering as potential solutions. These approaches can be optimal, depending on the specific requirements and scope of the changes being requested.
A Sitecore Variant may be the solution if you have the following conditions:
Here’s a simple guide to setting up your variants within Sitecore. I’ll walk you through the process step by step, providing enough detail to ensure you understand the setup, but keeping it concise so you can quickly grasp how everything works.
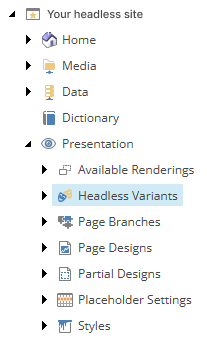
First, let's identify where all the variants are stored in your project. Knowing the location of your variants is essential for efficient management and updates. Below is the standard path to the variants folder item:
/sitecore/content/<project>/<site>/Presentation/Headless Variants
Within your headless site, navigate to the Presentation folder. There, you’ll find a subfolder called Headless Variants, which contains all the variants for that site. Below you will see a sample image of how it should look like when you navigate inside the Content Editor. Awesome! Now, let's move on to adding a new variant.
You’ll need to create two additional items within the Headless Variants folder, using the Headless Variants template and the Variation Definition template.
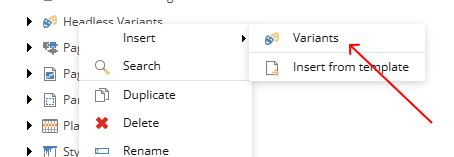
Let’s begin by using the Headless Variants template. Below is an image showing what it looks like when you right-click on the Headless Variants item. Be sure to name the new item based on the component name from your rendering item. For example, if your Json Rendering has its component name set to "Card," name the new item accordingly.
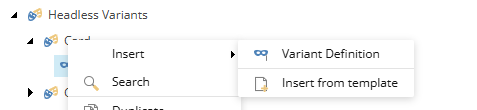
Once your Headless Variants template item is set up, the next step is to add child items under the newly created item. The first child item to create is always the Default variant, as every component will have a Default variant. Below you will a screenshot of your it should look like when adding a new Variant Definition template item into your Card item.
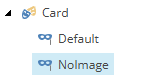
Next, you can add multiple Variant Definitions based on the number of variants your component requires. For our example, we're using "NoImage." Note that the naming format follows the convention used for functional components in Next.js.
I’ve covered how to create your variant in XM Cloud. To complete the process, you'll need to set up the variant in Next.js. To help you with this, here’s a blog that further talks about creating rendering variants for your XM Cloud Project using Next.js.
There may be scenarios where using a Sitecore variant remains a suitable choice, but the conditions mentioned above are some of the most critical to consider. The second option, creating an entirely new Sitecore rendering, is still a viable approach. Below are a few reasons why you might choose to go with this option instead.
This is one of the foundational steps and when you have already reached a point to branch out creating your components, you have probably created one. Nevertheless, here is a blog that can give you a good explanation on creating your component right.
When components behave differently based on their container, creating separate variants or new components isn’t always the best solution. For instance, if you’re considering splitting a Card component into FullWidth and TwoColumn variants, you could face the challenge of restricting Content Authors from choosing the correct variant for each container. The goal is to have a single component that adapts to the value provided by the container component. This is where React Context can be particularly helpful.


You will need to create your context, these will let you drill down props without having to pass it explicitly. This solves the challenge of dynamically passing data to any allowed child component within the placeholder. Here’s a simple code that will do the trick.
import { createContext } from 'react';

export type ContainerContextType = {
  containerName: string;
};

export const ContainerContext = createContext<ContainerContextType>({
  containerName: '',
});
The code above creates an object that contains containerName which will hold the value of the container’s name which the component will pass this information down to it’s children.
<div>
  <ContainerContext.Provider
    value={{
      containerName: "fullwidth"
    }}
  >
    <Placeholder name={phKey} rendering={rendering} />
  </ContainerContext.Provider>
</div>
Here’s a rough idea of how the context will be setup on your container components. You can then access this in your child components like this.
import React, { useContext } from 'react';

const Accordion = ({ fields, rendering, container, params }: AccordionProps): JSX.Element => {
  const { containerName } = useContext(ContainerContext);

  // .... rest of the code
};
With that information in place, you can simply configure your classes and even switch between components without having to create multiple items in Sitecore.
We discovered a new perspective on using React Context. This approach allows for the development of adaptable components without manually adjusting variants in Sitecore. By centralizing maintenance within your frontend code, it simplifies solutions and removes the need for revisions or additional builds in Sitecore.
While this method doesn’t replace Sitecore variants entirely, it offers additional flexibility for tackling different challenges in your projects. Whether you're new to Next.js or already experienced, the process may seem daunting at first, but with exploration and practice, you'll find it surprisingly straightforward to implement.
We're also exploring alternative ways to manage variations to minimize the need for unique component names—stay tuned for updates once we publish our findings. Check out the blogs below to help guide you on your Sitecore development journey.