Every year the Sitecore Hackathon has come and gone. I’ve largely been too afraid to commit and not confident in my own abilities to sign up. I decided that would not be this year. This year I joined fellow Fishtank dev, Devin Dunn, and teamed up as the Guppy Code Crew to challenge ourselves, learn lots, and just have fun.
Preparation
Leading up to the day of the Hackathon we really only did two things.
- Setup an instance Sitecore 10.3 XM using Docker locally
- Setup Sitecore Foundation Head for XM Cloud via Docker locally
We did this because we really didn’t know what the topics were going to be, so by having two environments ready to go, we were then able to pick which one we’d proceed with and not spend an hour, or more, setting up our working environment.
Concepts
When the announcement of the the topics came out at 5pm MST we began our brainstorming. This year the ideas were centered around two rather broad areas.
- Best use of AI
- Best Module for XM/XP or XM Cloud
I wouldn’t lie, “Best use of AI” is a very attractive concept. I had already built a custom field that pulled information from Chat GPT. While that was a possibility, there were a lot of questions. For example: “How do we manage access to the API?” For our first time out, going with the the “Best Module for XM/XP or XM Cloud” was the best choice.
From there we could go two avenues, focusing on developers or authors. Naturally our minds went to, how do we make our lives easier and more efficient? That right there was what sold us on creating a PowerShell module. Coming up with the desire to auto populate GraphQL queries so that you didn’t spend unnecessary time trying to write one that worked, just hit home.
The Build
Our final build can actually be found here: 2024-Guppy-Code-Crew.
If you didn’t want to download the complete Docker repo, you could go into docs/modulefiles and download
the PowerShell module as well as the test content packages.
Main Goal
While PowerShell can do wonders, one thing I never really figured out how to do was create a PowerShell script that could be activated via the scripts sub menu while on an item. That way the query itself could be very contextual and not require someone going to the IDE.
The whole point would be to allow a developer, while they’re building the front-end or resolving issues, be able to pull up a GraphQL query for an item or layout, and utilize it within the Edge Playground to debug issues. Or simply use the query as is as part of a front-end component.
Requirements
Perhaps the most important aspect of all of this was the need to produce clean, documented code. We couldn’t just create some wild PowerShell script that you couldn’t follow. So importing functions and storing said functions inside other items… hadn’t done that before either.
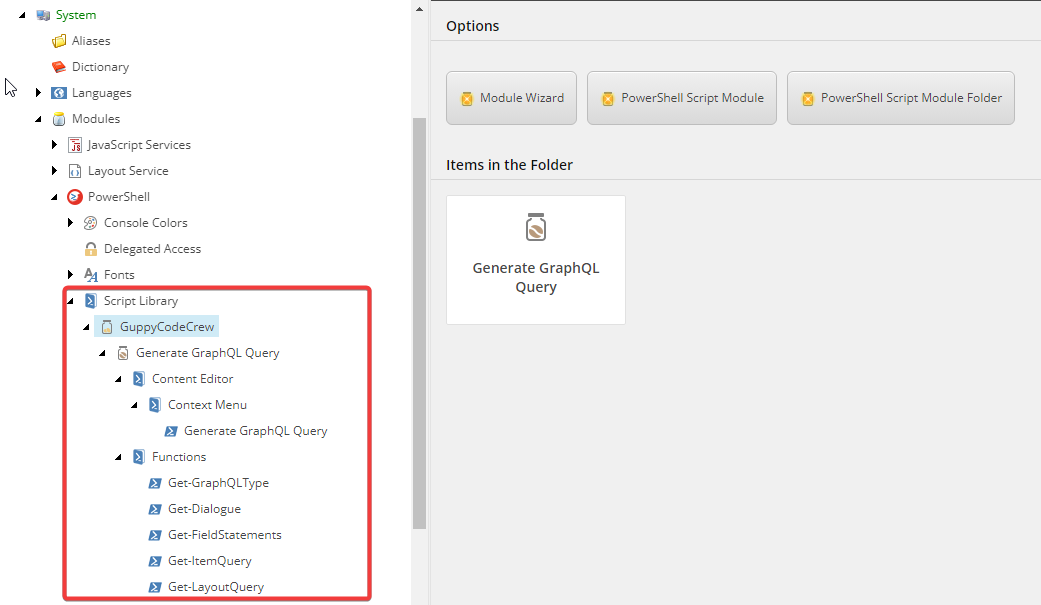
You can see below we broke up the primary script, Generate GraphQL Query, to be launched via a
right-click on an item.

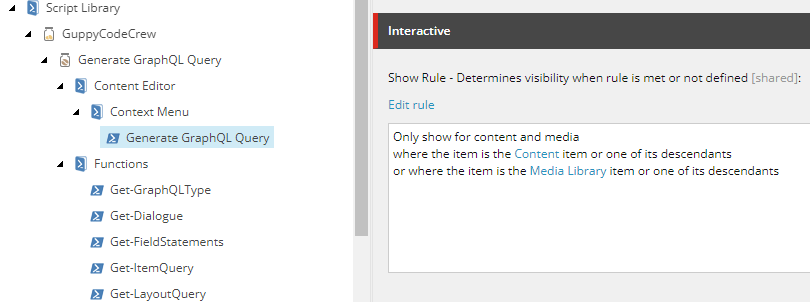
We also wanted it to only run within the Content and Media tree thus setting up when it would show, via the
Show Rule field, that was easily managed.

In the Script Body field we added our primary script:
Import-Function Get-GraphQLType
Import-Function Get-FieldStatements
Import-Function Get-LayoutQuery
Import-Function Get-ItemQuery
Import-Function Get-Dialogue

# Grab Context Item From Right-Click
$item = Get-Item .

# Get the template of the item
$templateItem = Get-ItemTemplate -Item $item

# Initialize an array to store field objects
$fields = @()

# Iterate through all fields of the template
$templateItem.Fields | Where-Object { $_.Type -ne "Standard Template fields" } | ForEach-Object {
    # Create a custom object for each field
    $fieldObject = [PSCustomObject]@{
        Name = $_.Name
        Type = $_.Type
    }

    # Add the field object to the array
    $fields += $fieldObject
}

# Define the GraphQL query for item format
$queryItem = @{
    item = @{
        path = $item.Paths.FullPath
    }
    fields = @{}
}

# Iterate through all fields of the item
foreach ($field in $fields) {
    # Get the field type
    if ($field.Name -like "__*") {
        continue
    }
    $fieldType = $field.Type
    # Call the new function to add field types to GraphQL query
    $queryItem.fields = Get-GraphQLType -FieldType $fieldType -FieldName $field.Name -QueryItemFields $queryItem.fields
}

#Generate field structure by type to be used as part of Item Query
$fieldStatements = Get-FieldStatements -QueryItemFields $queryItem.fields

# Define the GraphQL Item Query format
$graphQLItemQuery = Get-ItemQuery -Path $queryItem.item.path -Language "en" -TemplateName $templateItem.Name -FieldStatements $fieldStatements

# Define the GraphQL Layout Query format
$graphQLLayoutQuery = Get-LayoutQuery -Item $item

# Create Dialog
$result = Get-Dialogue -GraphQLItemQuery $graphQLItemQuery -GraphQLLayoutQuery $graphQLLayoutQuery
Write-Host $result
Each Import-Function would be pulled from the function items located in the Functions
folder.
It was important to document the purpose, parameters and example use of each function such that they could be understood and potentially re-used. I highly recommend documenting each of your PowerShell modules and functions in this manner as it will save you time in the future when trying to understand it after a hiatus.
<#
.SYNOPSIS
    Get-GraphQLType generates statements for all field types to be used in GraphQL queries.

.DESCRIPTION
    This function generates a hashtable of all custom fields and specifies the name and GraphQL type

.PARAMETER FieldType
    Specifies the field type of the field being passed

.PARAMETER FieldName
    Specifies the field name of the field being passed

.PARAMETER QueryItemFields
    Specifies the hashtable being passed

.EXAMPLE
    $queryItem.fields = Get-GraphQLType -FieldType $fieldType -FieldName $field.Name -QueryItemFields $queryItem.fields

    This example returns the hashtable for all fields
#>
Creating a Dialogue Box
Ensuring everything displayed nicely was also a nice requirement for us and something we had also never done before.
By examining other context scripts such as the Tenant and Site creation scripts, we were able to determine what we needed to generate a tabbed base dialog menu.
function Get-Dialogue {
 <#
.SYNOPSIS
    Get-Dialogue opens a window for the user to view the GraphQL query they have generated. Determined whether or not an item has a layout.
.DESCRIPTION
    This function creates all text to be displayed in a results window, where generated GraphQL queries are displayed. If the item has a layout, Get-Dialogue provides a second tab to display the layout query.

.PARAMETER GraphQLItemQuery
     Generated GraphQL query to retrieve all item fields and values.

.PARAMETER GraphQLLayoutQuery
     Generated GraphQL query to retrieve all layout fields and values.

.EXAMPLE
     $result = Get-Dialogue -GraphQLItemQuery $graphQLItemQuery -GraphQLLayoutQuery $graphQLLayoutQuery -Description $description -Title $title
     This example creates a UI to display the GraphQL queries generated for both the item, and the layout (if it exists). Uses Description and Title to populate the
     heading and description text of the UI element.
#>
   param (
        [string]$GraphQLItemQuery,
        [string]$GraphQLLayoutQuery
    )

    # Define dialog menu text
    $description = "GraphQL queries grouped by tabs"
    $title = "Guppy Code Crew GraphQL Query Generator"
    $fieldTitle = "Copy and Paste Query Below Into Playground or as query"
    $toolTip = "You can put multi line text here"
    $placeholderText = "You see this when text box is empty"

    # Determine dialog to show whether item has layout or not
    if ($item."__Renderings") {
        $result = Read-Variable -Parameters `
            @{ Name = "multiText"; Value=$GraphQLItemQuery; Title=$fieldTitle; lines=20; Tooltip=$toolTip; Tab="Item Query"; Placeholder=$placeholderText},
            @{ Name = "layoutText"; Value=$GraphQLLayoutQuery ; Title=$fieldTitle; lines=20; Tooltip=$toolTip; Tab="Layout Query"; Placeholder=$placeholderText}`
            -Description $Description `
            -Title $Title -Width 600 -Height 640 -OkButtonName "Close"
    } else {
        $result = Read-Variable -Parameters `
            @{ Name = "multiText"; Value=$GraphQLItemQuery; Title=$fieldTitle; lines=20; Tooltip=$toolTip; Tab="Item Query"; Placeholder=$placeholderText}`
            -Description $Description `
            -Title $Title -Width 600 -Height 640 -OkButtonName "Close"
    }

    return $result
}
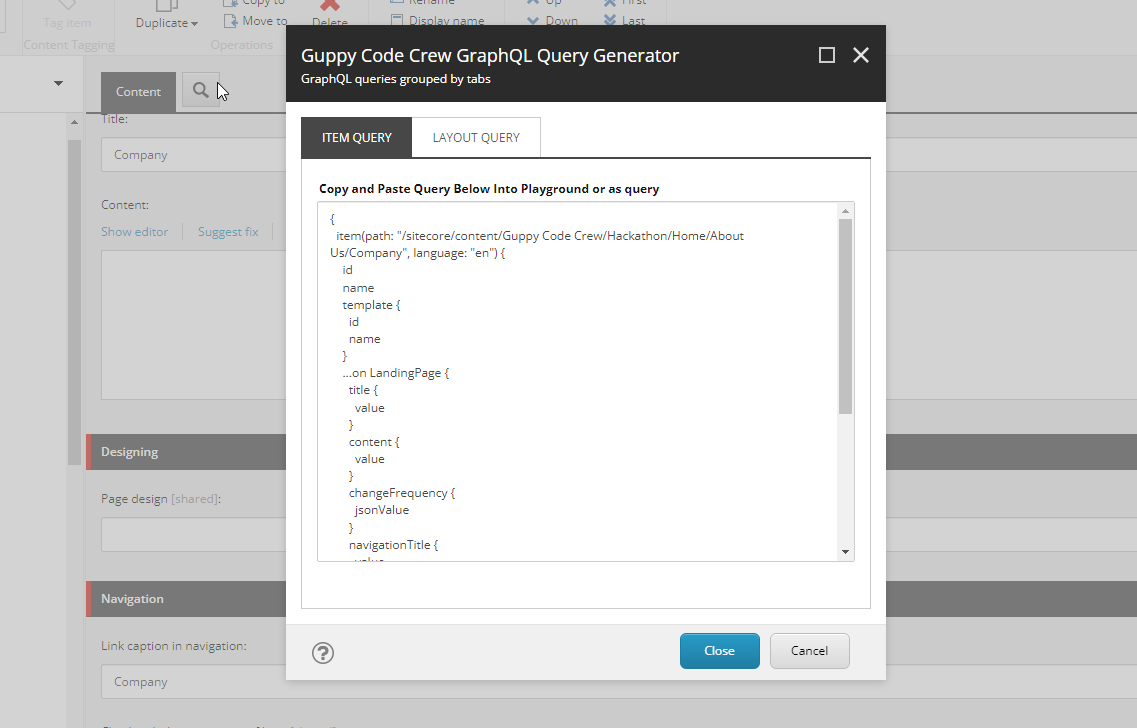
Utilizing the Read-Variable function we were able to get the following dialogue menu which if a layout
was present, would show the Layout Query for the particular item.

The Result
One aspect I wasn’t prepared for was the need to create a video of our solution. Fully understanding all the deliverables really requires you to work backwards to determine the code ultimately needs to be finished. Finishing your code an hour before the deadline, while not impossible, can potentially result in unnecessary panic and frustration.
We were fortunate and had what we both agreed was a suitable submission approximate 4 hours before deadline allowing us to not only run checks through a faux QA environment, but also take some time to put together a decent video (quality aside).
Looking Back
For a first attempt at the Sitecore Hackathon, or any hackathon for that matter, I’m very proud of what Devin and I were able to put together in such a short period of time.


