Reading time: 5 min read
Deploying from Azure DevOps to Vercel: A Comprehensive Guide
Using Vercel CLI to create a targeted Deployment Pipeline within ADO.
Start typing to search...
Deploying web applications from Azure DevOps to Vercel can be challenging due to limitations in direct repository integration. To address this limitation, Vercel has released a Pipeline extension but it is lacking in features and pushes the entire branch, which takes all files regardless of their relevance to your Headless application.
This guide provides a robust, flexible solution for deploying your projects while ensuring only relevant files are transferred and deployed.
The approach involves:
Before starting, ensure you have:
npm install -g vercel)parameters:
- name: vercelProjectAlias
displayName: Vercel Project Target
type: string
default: dev
values:
- dev
- storybook
- prod
trigger:
- none
jobs:
- job: VercelDeploy
displayName: "Vercel Deployment"
pool:
vmImage: ubuntu-latest
steps:
- checkout: self
- task: PowerShell@2
displayName: "Vercel Release Script"
inputs:
targetType: 'inline'
script: |
# Validate and prepare deployment
$projectAlias = "${{ parameters.vercelProjectAlias }}";
Write-Host "Preparing deployment for: $projectAlias"
# Safely change to sources directory
cd "$(Build.SourcesDirectory)/"
# Navigate to rendering directory
# Note this path would be need to match the name of your rendering directory
cd src\rendering
# Dynamically rename Vercel configuration folder
if (Test-Path -Path ".vercel-$projectAlias") {
Rename-Item -Path ".vercel-$projectAlias" -NewName ".vercel"
} else {
Write-Error "Project alias configuration not found: .vercel-$projectAlias"
exit 1
}
# Execute deployment script
.\vercelrelease.ps1
Two callouts from the above.
values. We’ve outlined, dev, and storybook. You can add or remove keys to match the target environments for your implementation.cd src\rendering. You will need to update this to point to your solutions rendering directory. try {
# Validate required environment variables
if (-not (${env:VERCELSCOPETOKEN} -and ${env:VERCELSCOPE})) {
throw "Missing Vercel authentication credentials"
}
Write-Host "Installing Vercel" -ForegroundColor Green
# Install specific Vercel CLI version
# you can use npm install --global vercel@latest
npm install --global vercel@33.5.5
Write-Host "Env Var Pull" -ForegroundColor Green
# Pull environment variables securely
vercel env pull --yes --environment=preview `
--token ${env:VERCELSCOPETOKEN} `
--scope ${env:VERCELSCOPE}
Write-Host "Deploy" -ForegroundColor Green
# Deploy to production with verbose logging
vercel --prod `
--token ${env:VERCELSCOPETOKEN} `
--scope ${env:VERCELSCOPE}
}
catch {
Write-Error "Deployment failed: $_"
exit 1
}
Under your Rendering directory create a new folder for each environment you are planning on deploying to.
For example, .vercel-{alias} should be .vercel-dev, or *.*vercel-storybook, etc. These should match the projectAlias values you set from the deploy-vercel.ymlfile.
Each folder will contain a project.json file containing:
{
    "orgId": "team_TEAMKEY",
    "projectId": "prj_PROJECTKEY"
}
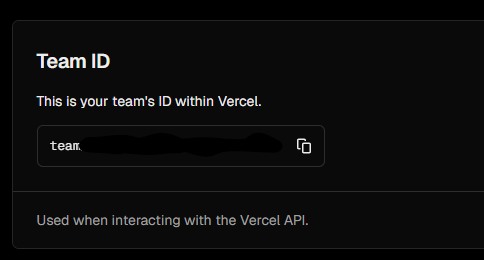
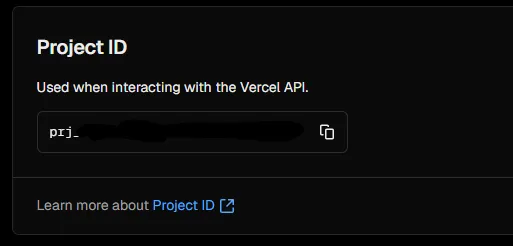
These details are located in the target project within Vercel.
orgId can be found in the Team/Organization settings, under General.
projectId can be found in the Project/Site settings, under General.
Each folder should have their own unique project.json that corresponds to the matching Project (Site) in Vercel that this solution will be deployed to.
After you setup a new pipeline using the above vercel-deploy.yml file.
Within the new Pipeline you need to create two variables (unless you placed these values in a Key Vault):
VERCELSCOPETOKEN (API token provided to you by Vercel)
Go to your Account Settings and create a new Token. Note, all actions will be bound to the account that issues the token in the logs.VERCELSCOPE (Org name in Vercel .. ex vercel.com/ACCOUNTNAME)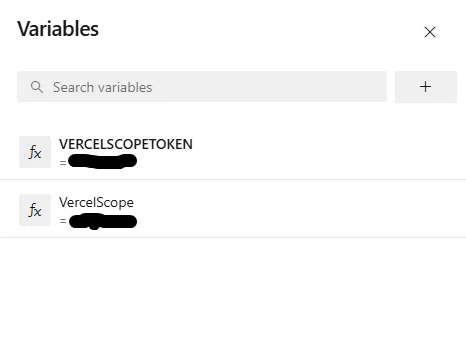
.vercel-{alias} directories exist--debug flag with Vercel CLIWhile this deployment solution provides a robust way to connect Azure DevOps with Vercel, it's important to understand its constraints. The approach requires manual setup and maintenance of configuration files for each environment you want to deploy to, which can become time-consuming as your project grows.
Additionally, the solution's reliance on specific Vercel CLI versions means you'll need to carefully manage version updates to avoid breaking changes in the deployment process. The deployment pipeline also assumes a consistent directory structure across your projects - any deviation from this structure will require modifications to the deployment scripts.
These limitations, while manageable, should be carefully considered when implementing this solution in your development workflow, especially for larger organizations with multiple projects or complex deployment needs.
This deployment solution could be enhanced in several meaningful ways to improve its flexibility and reliability. A key improvement would be implementing dynamic token management to automate the rotation and secure handling of Vercel authentication tokens, reducing manual intervention and improving security.
The environment detection system could be made more flexible by implementing automatic configuration discovery and dynamic environment mapping, eliminating the need for manual environment-specific setups.
Additionally, developing more comprehensive error handling would enhance the solution's reliability by providing detailed error reporting, automatic retry mechanisms for common failures, and smart recovery procedures for interrupted deployments.
These improvements would collectively make the solution more maintainable, secure, and suitable for larger-scale deployments while reducing the operational overhead for development teams.