Getting Started With Your First Recipe in Sitecore Connect
When it comes to making sure all your systems are working together in harmony, integrating and automating workflows is essential for maintaining efficiency and effectiveness. This is where Sitecore Connect becomes your best friend. Sitecore Connect is a powerful tool that allows you to seamlessly integrate various services and automate processes, making your business efforts more streamlined and productive.
In this blog, I will guide you through the process of implementing your first recipe in Sitecore Connect from the community library. If you aren’t familiar with Sitecore Connect I would recommend checking out my blog “What is Sitecore Connect” as it goes into a little more detail about the platform. From learning what a recipe is and why you should use them to creating and deploying community recipes for production use, I will cover all the essential steps and provide tips to help you get started. By the end of this guide, you'll have a solid understanding of how to leverage Sitecore Connect to enhance your business through automation.
What is a Sitecore Connect Recipe and Why Should You Use One?
A Sitecore Connect recipe is a predefined workflow that automates a series of tasks based on specific triggers and actions. Think of it as a set of instructions that tells Sitecore Connect what to do when certain conditions are met. Triggers are what cause a workflow to start working and actions are what tasks the workflow will perform once the trigger is hit. There are thousands of different apps you can connect with Sitecore Connect and each one has the potential to help your business stay streamlined and efficient.
Why You Should Use a Sitecore Connect Recipe
There are many reasons why you should leverage Sitecore Connect and start using your first recipes. Some good examples of why can be seen below:
- Save Time and Effort: Automating repetitive tasks means you and your team can focus on more strategic work. Recipes handle the routine processes for you, freeing up valuable time.
- Ensure Consistency: Recipes ensure that tasks are performed the same way every time, reducing the risk of human error and maintaining a consistent standard across your workflows.
- Improve Efficiency: By linking different services and automating their interactions, recipes make your overall marketing process more efficient. This can lead to faster execution and better results.
- Enhance Integration: Sitecore Connect recipes allow you to easily integrate various tools and platforms, ensuring seamless data flow and improving the overall functionality of your digital ecosystem.
- Boost Customer Engagement: Automated workflows can help you respond to customer actions more quickly and accurately, improving customer satisfaction and engagement.
Creating and using recipes in Sitecore Connect can transform how you manage your operational tasks, making them more efficient and your strategies more effective. In the next sections, I will guide you through the Sitecore Connect dashboard and then go into the process of creating your first recipe.
The Sitecore Connect Dashboard
When you first login to Sitecore Connect you will be met with the dashboard. This is the home of Sitecore Connect and offers different insights into how your recipes are performing and acts as a launchpad to access all the features Sitecore Connect has to offer. You can access community recipes right from the dashboard. In this blog we won’t go to in-depth on the other aspects of the platform but will focus on implementing community built recipes.
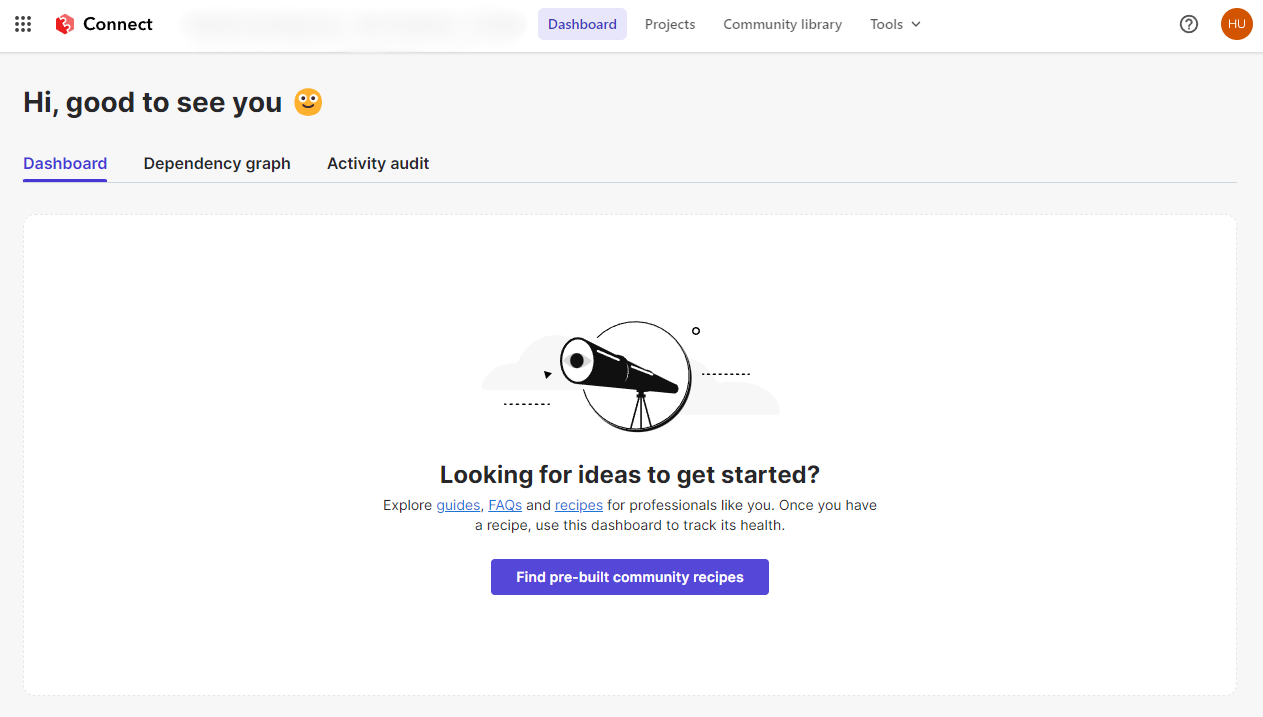
Pre-Built Community Recipes
Together, we’ll go over the process of implementing pre-built community recipes to your own Sitecore Connect instance. This is the simpler way of the two recipe options and allows you to utilize automations that other Sitecore Connect users have already built out instead of building from scratch. With a large community there are already pre-built recipes for a lot of different apps, depending on what you are looking to accomplish with your recipe this may be as far as you need to go and could save a lot of time and effort compared to building from scratch.
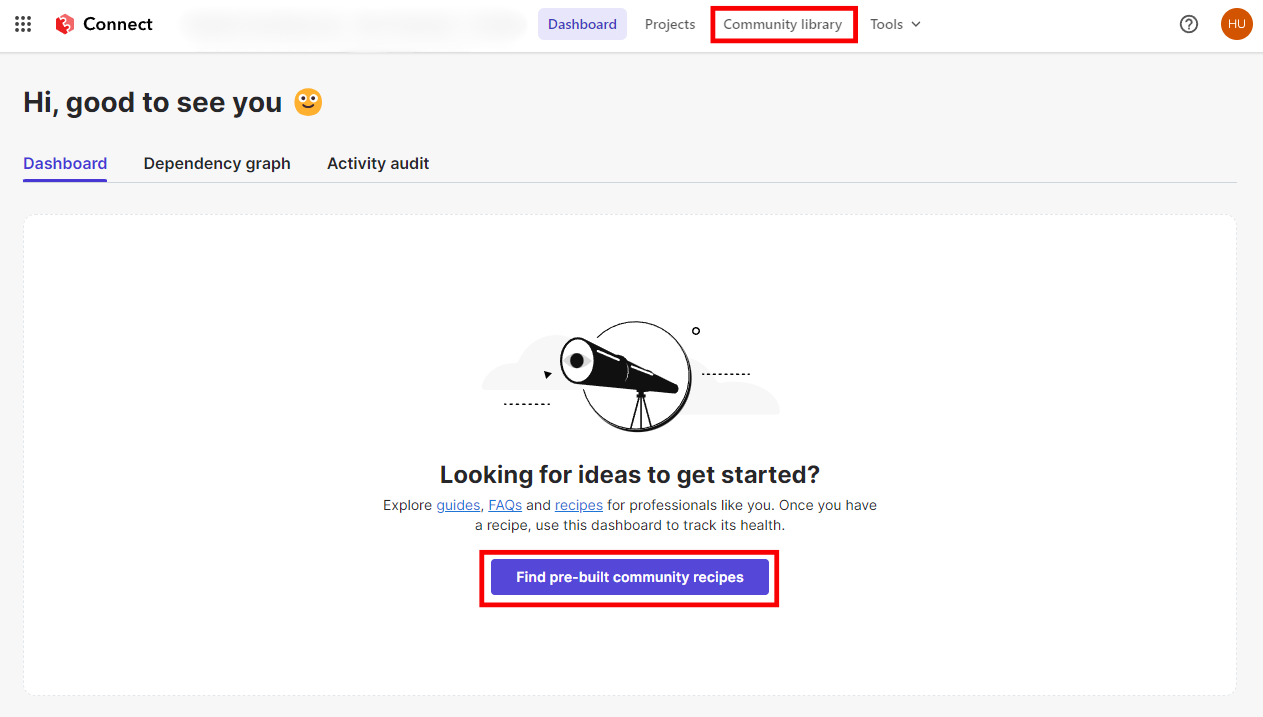
Navigating to the Community Library
There are two ways to get to the community library within Sitecore Connect. Highlighted below, you can see that you can access the community library from either the top ribbon of Sitecore Connects interface or if you haven’t created a recipe yet you’ll see that the dashboard will also encourage you to navigate there alongside guides and FAQs to get you started on the platform.
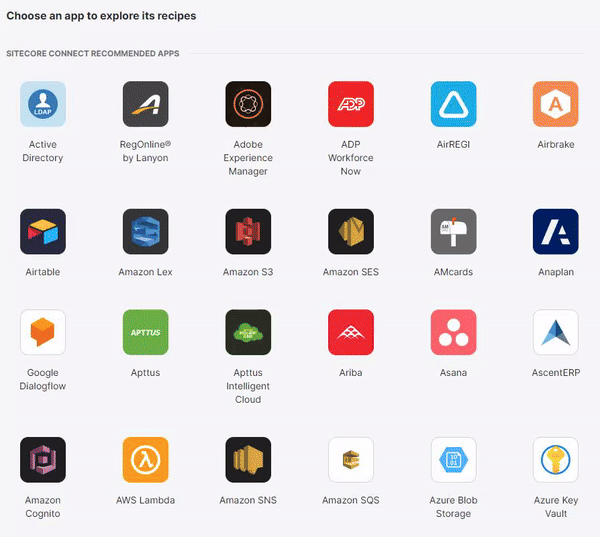
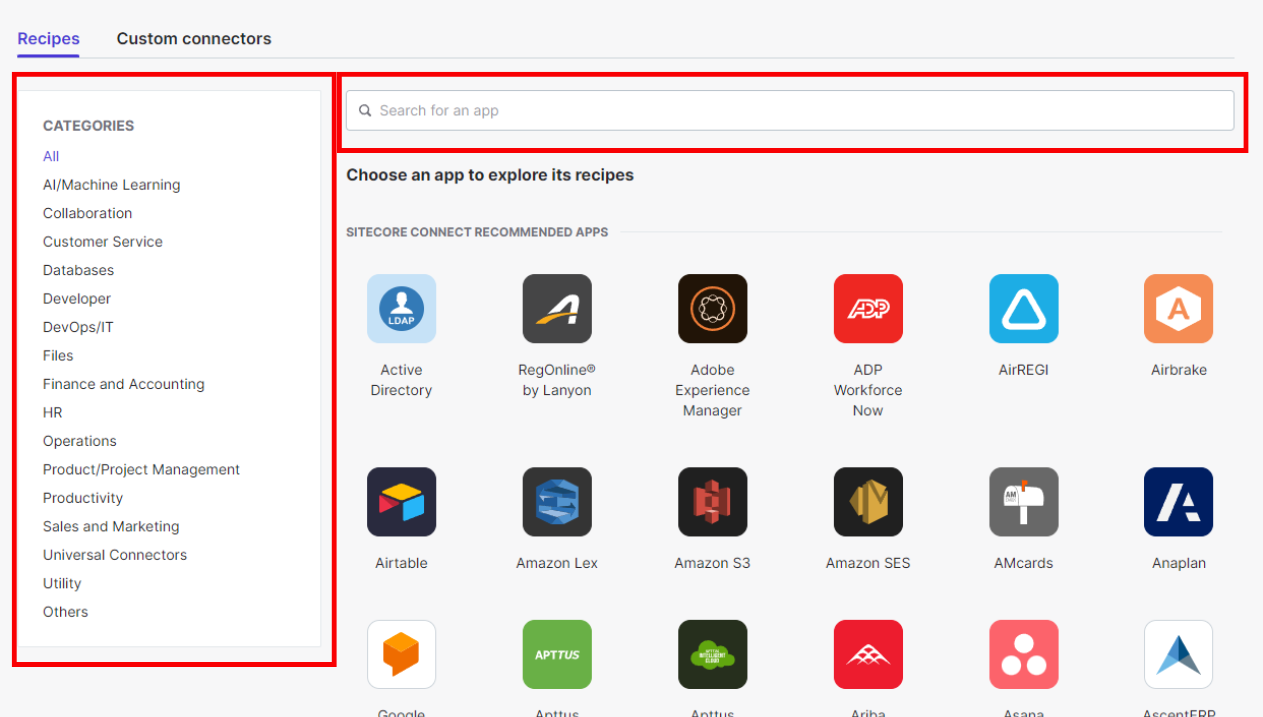
Finding an App to Explore Recipes
It’s easy to find an app that you are interested in community recipes for within Sitecore Connect. Once you’ve navigated to the community library an interface will come up that allows you to explore all the recommended apps as well as some filters and search functionality you can use to narrow down your hunt and find exactly what your business needs. Navigating through the recommend apps can be a hassles as you can see below (I don’t even get through all of it scrolling at that speed), so I recommend using the built in search and filtering system to find what you’re looking for.
Selecting an App to Explore Recipes
Now that we know how to find the app we are looking to use community recipes for let’s find one that fits the business needs. For this blog I am going to keep things fairly straightforward and use some basic Google Calendar recipes. Using the search bar you can type in Google Calendar and it will narrow your search, once the Google Calendar app is showing up in your interface you can click on it to find the community recipes.

For this example we are going to use the Record Google Calendar events to Google Sheets recipe that was created by Workato.
Understanding Your Chosen Community Recipe
After navigating through the community library and finding our recipe of choice (Record Google Calendar events to Google Sheets) you can now click into the app to find the details of the recipe.
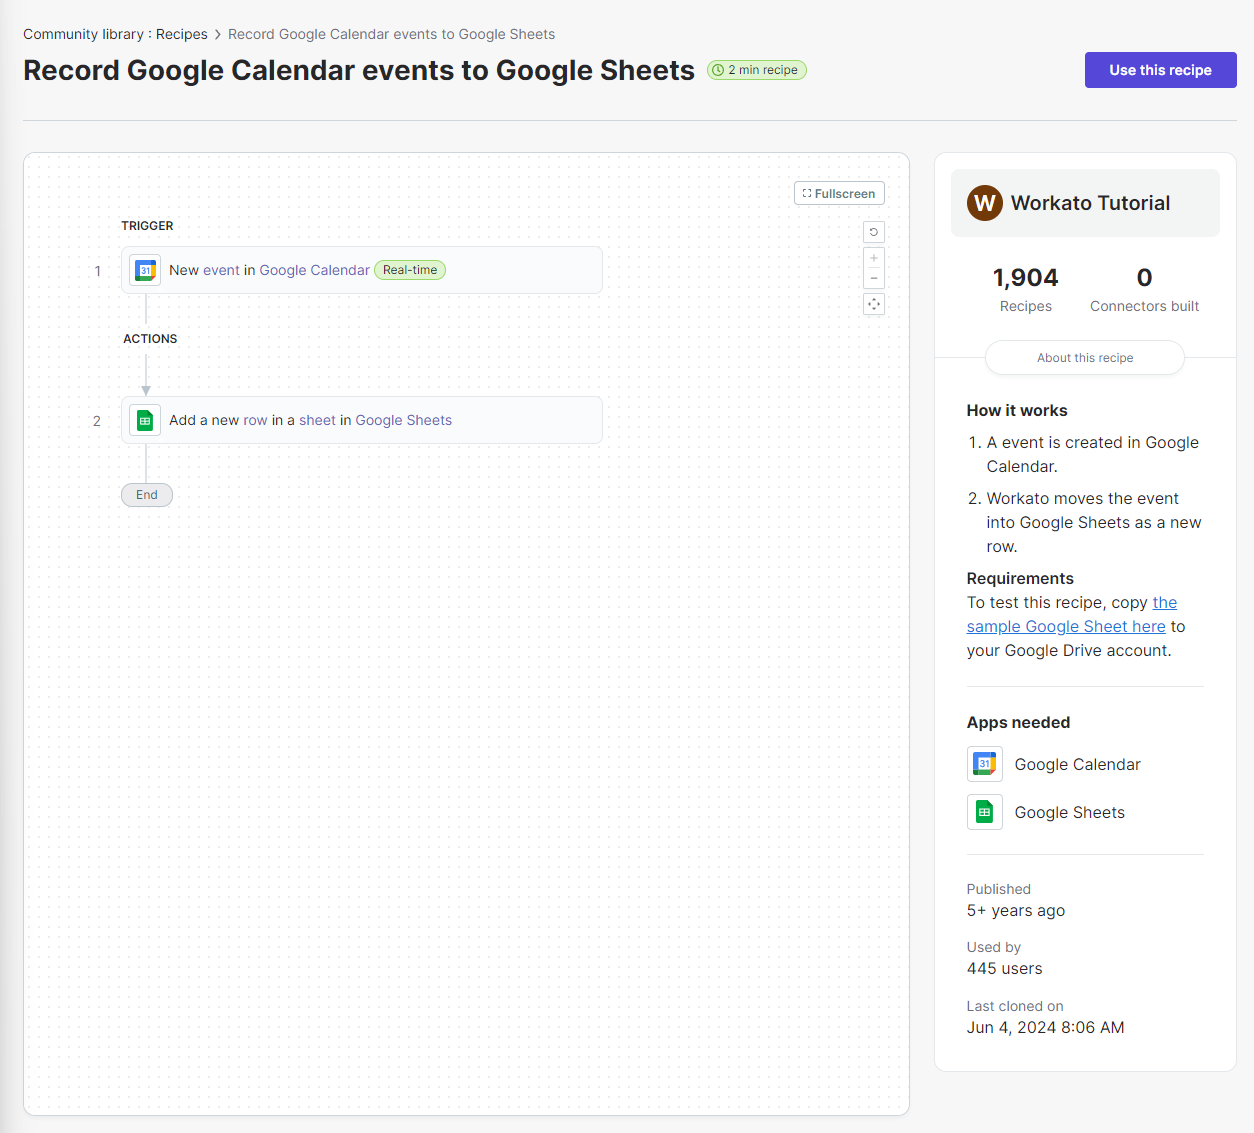
From here you can explore exactly what the recipe does and a description of how it works. For this recipe you’ll see from the screenshot above it is fairly simple that has One trigger and One action. You’ll see that once this recipe is in place every time you create a new event in Google Calendar it will it will catalog the event as a new row in Google Sheets. If you are following along with this guide you will need to download the sample Google Sheet. Now that we know what the recipe does and how it works we can hit the Use this Recipe button in the top right to begin setting up this recipe.
Using Your Selected Community Recipe
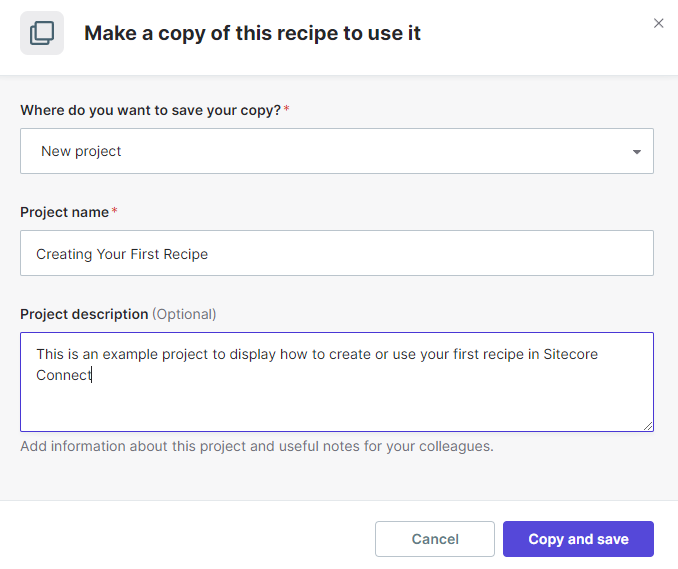
Once you’ve hit Use this recipe in the top right it will ask you to make a copy of the recipe to use it for yourself. From here you will need to choose which project to save it to, in our case we have no other projects so we will need to create a new one. I’ve named this new project Creating Your First Recipe and added a brief description (which is completely optional), but if you are following along you can use whatever name you’d like.
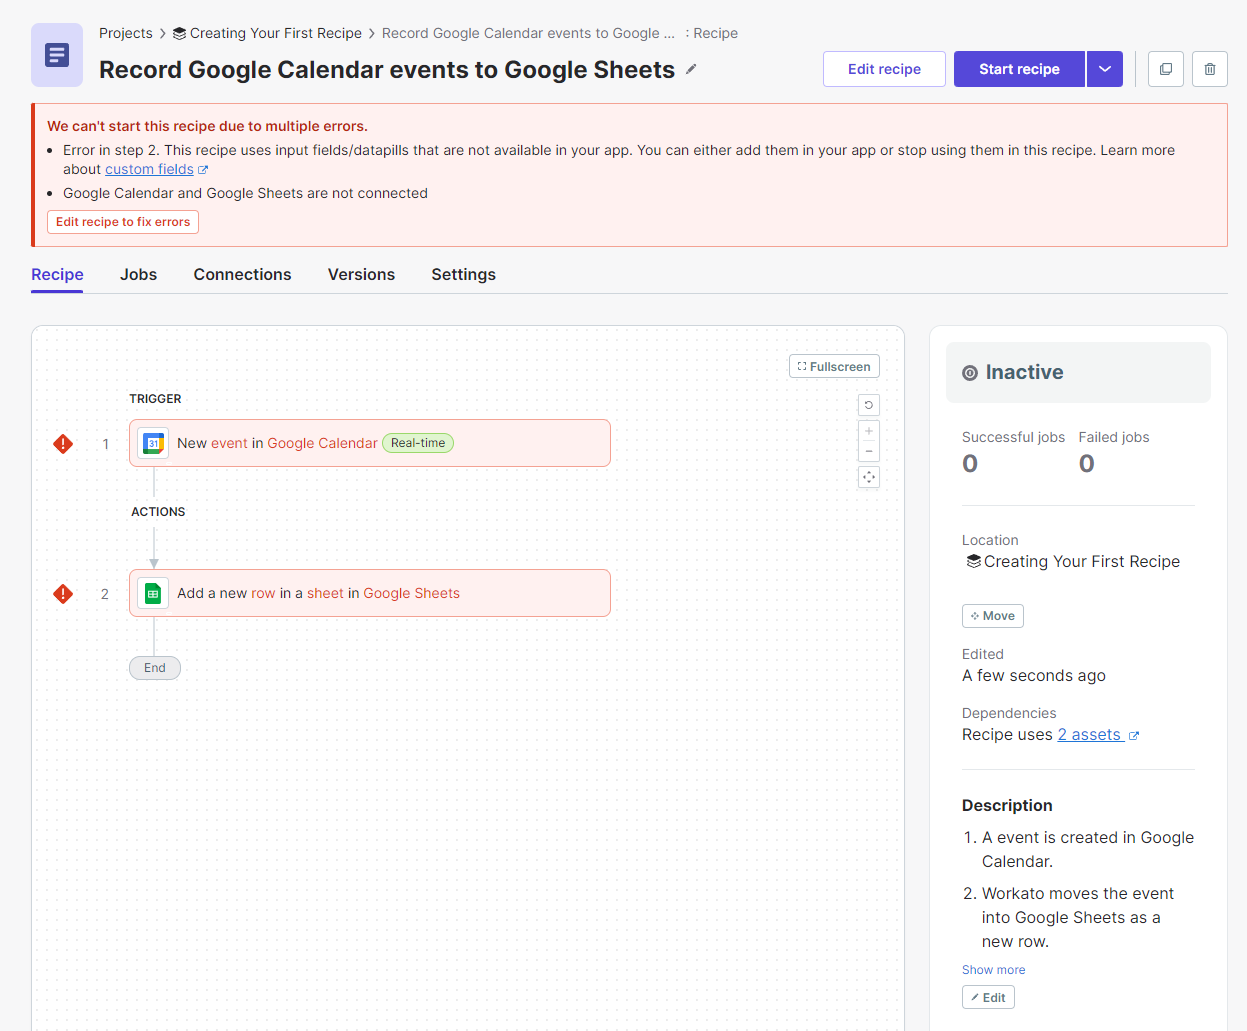
Now that all the fields are filled out we can hit the Copy and save button. When you copy and save this recipe it will add it into your projects and allow you to edit and run the recipe. You’ll notice though that because these apps haven’t actually been connected yet, you will be receiving errors related to the workflow. The errors received from this one are:
- Error in step 2. This recipe uses input fields/datapills that are not available in your app. You can either add them in your app or stop using them in this recipe. Learn more about custom fields
- Google Calendar and Google Sheets are not connected
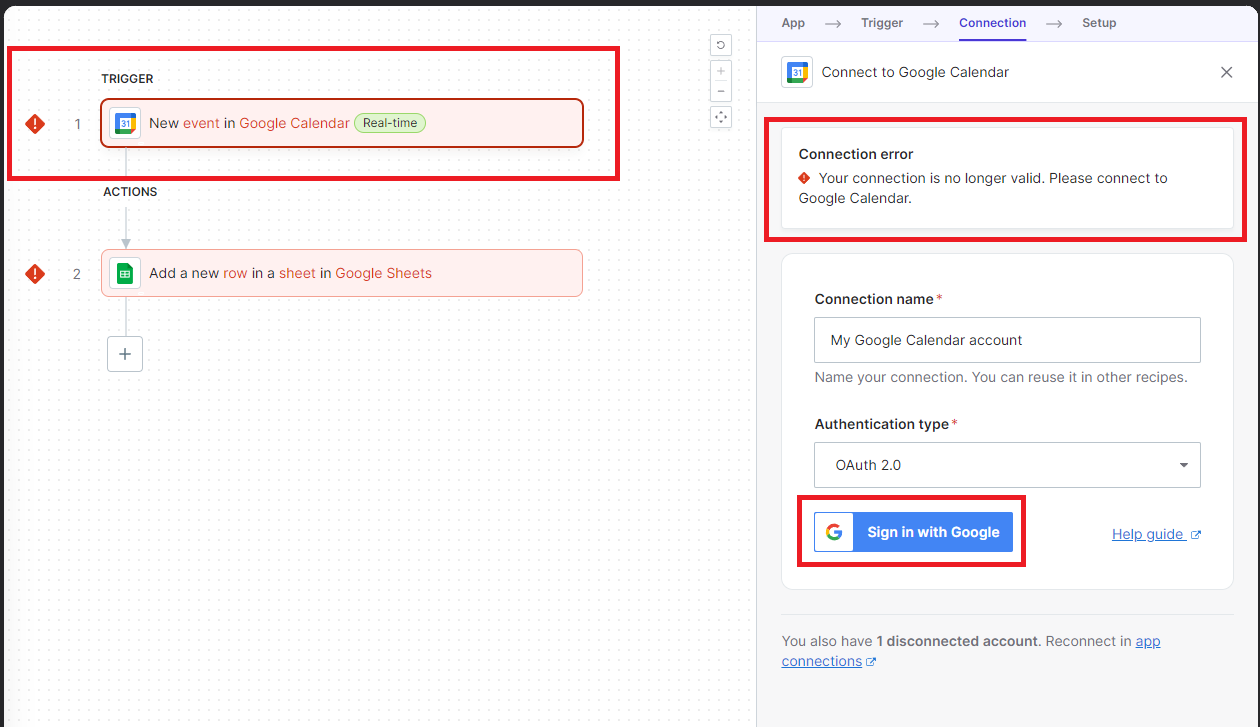
To fix these errors the first thing we need to do is connect our Google account. To do so first we will need to navigate to where it says Edit recipe to fix errors.

Once clicked you will be taken into the recipe editor interface. From here you can click on the Google Calendar trigger to start troubleshooting your errors. Because this just requires signing into google it is a very simple error to troubleshoot. Once clicked on, it will give you some more information on why the error is occurring and how you can fix it. You can see that this is a Connection Error and it is telling us “Your connection is no longer valid. Please connect to Google Calendar” underneath it is also giving us the option to sign in with Google which is what we will do. Because this error is not exclusive to Google Calendar we will also need to do the same for Google Sheets.
Now that our Google account is connected to both Google Calendar and Google Drive you’ll notice the errors have gone away and our recipe is good to start using, You can see how mine set up in the video below.
If for example you wanted to customize any part of the recipe you can click on the individual app connections and go through to edit the information. In this example there isn’t too much you can customize on the Google Calendar side of things but if you wanted to you could add more information on the Google Sheets side or less. For our example I will add one extra column to show the customization.
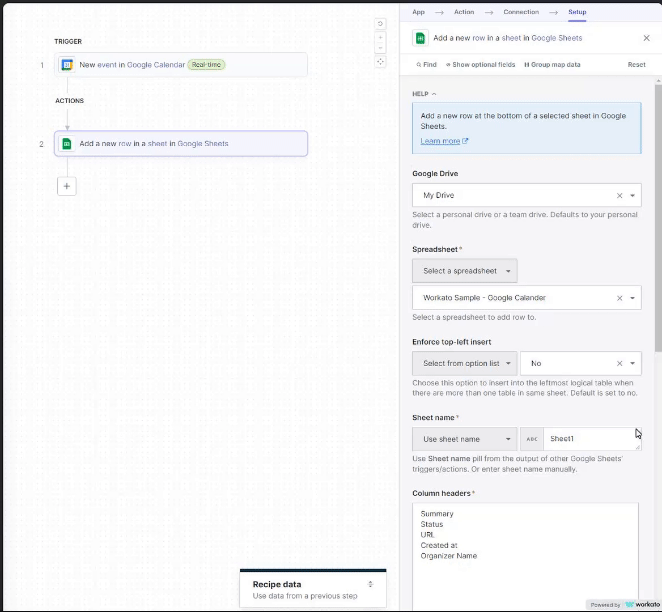
Customizing the Community Recipe
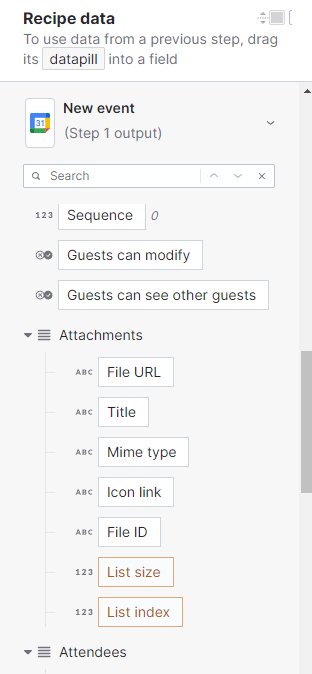
Like I said above there isn’t much you can set up in terms of customization for the Google Calendar trigger, however you can customize quite a few options in your Google Sheets connection. For our example let’s add a new data point to pull from Google Calendar into our Google Sheet. When clicking on your Google Sheet action you will see the Recipe data box next to the connection information. After going through the data let’s add a new field that outputs the File URL for an attachment to our Google Calendar Event.
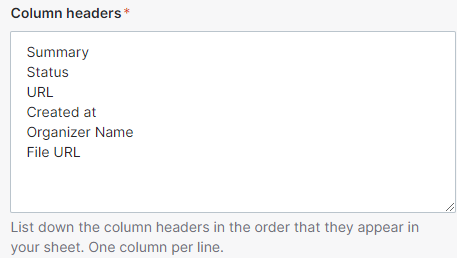
To set this up we will first need to add a new column to our spreadsheet and within the Column headers field in our Google Sheet action. First let’s go over to our spreadsheet. Right now we will only have the 5 default fields from the example sheet, Summary, Status, URL, Created at, and Organizer Name. But we’re going to add File URL.

Now that that is done, we can move back over to Sitecore Connect. We will need to define the new column in the Column headers field.
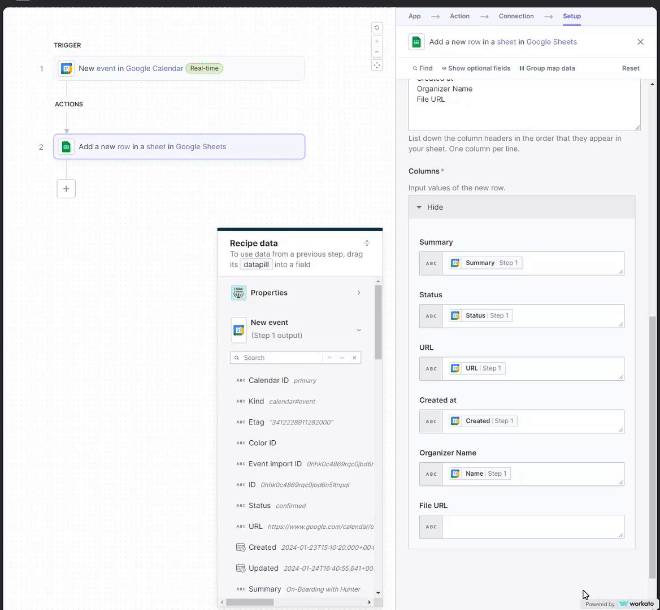
Once that is added you can scroll down a bit more to input values into your columns in the Columns field. To do this we will want to drag and drop the File URL data into the new field in columns. To do this you will need to click into the empty File URL column field and find File URL under File Attachments in Recipe data and once that’s done our recipe should be ready to test!
Testing Your Recipe
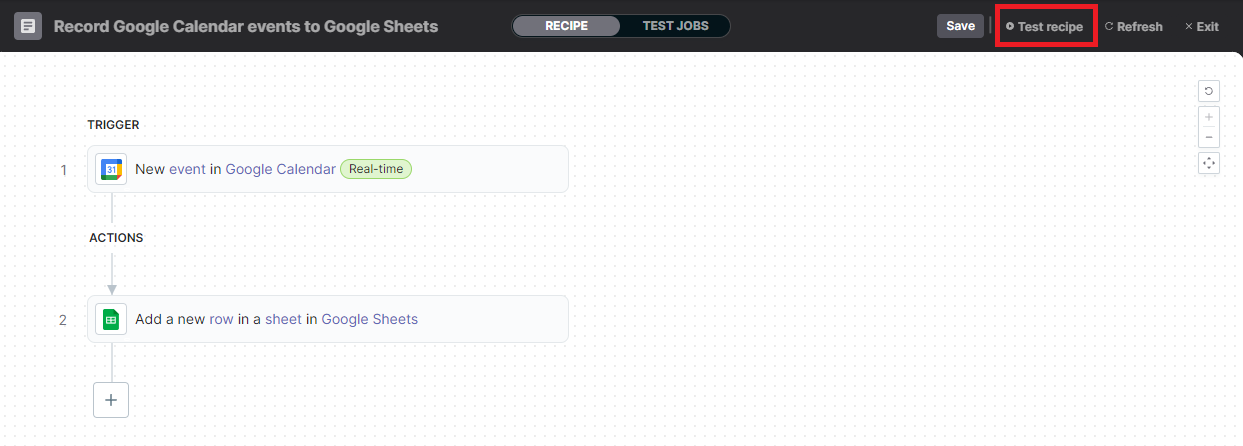
Now that the recipe is set up to our liking, it’s time for us to see if it actually works! To do this you can select the Test recipe option in the top right of the interface next to Save and Refresh.
Once you’ve selected Test recipe you will see it will begin searching for a trigger to run the action.
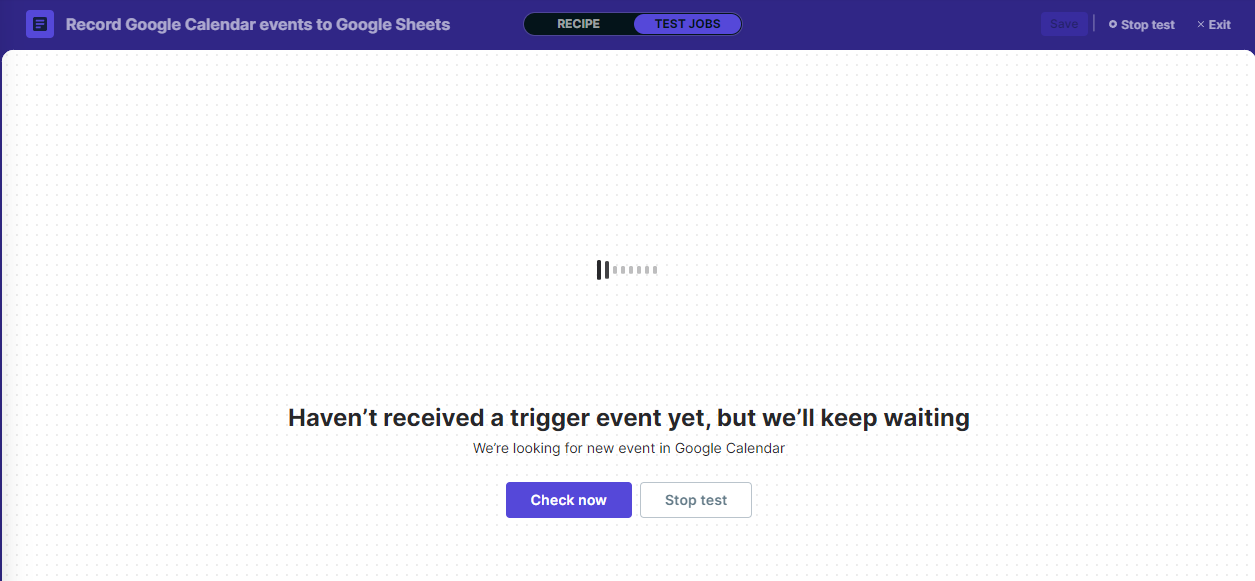
Now that we’re in our testing mode we should move over to Google Calendar and create a test event. This event can be named anything but we are also going to add an attachment to the meeting so we can make sure our customization works. Once you’ve switched over to Google Calendar and created your event you can select the Check now button in your testing screen or it may auto-refresh and check for you.
Once you test the event you will see that it was successful at receiving the trigger and triggering the action! If there were any errors in the process it would also show up here and detail what we could do to fix it, thankfully for our example though there were no errors.
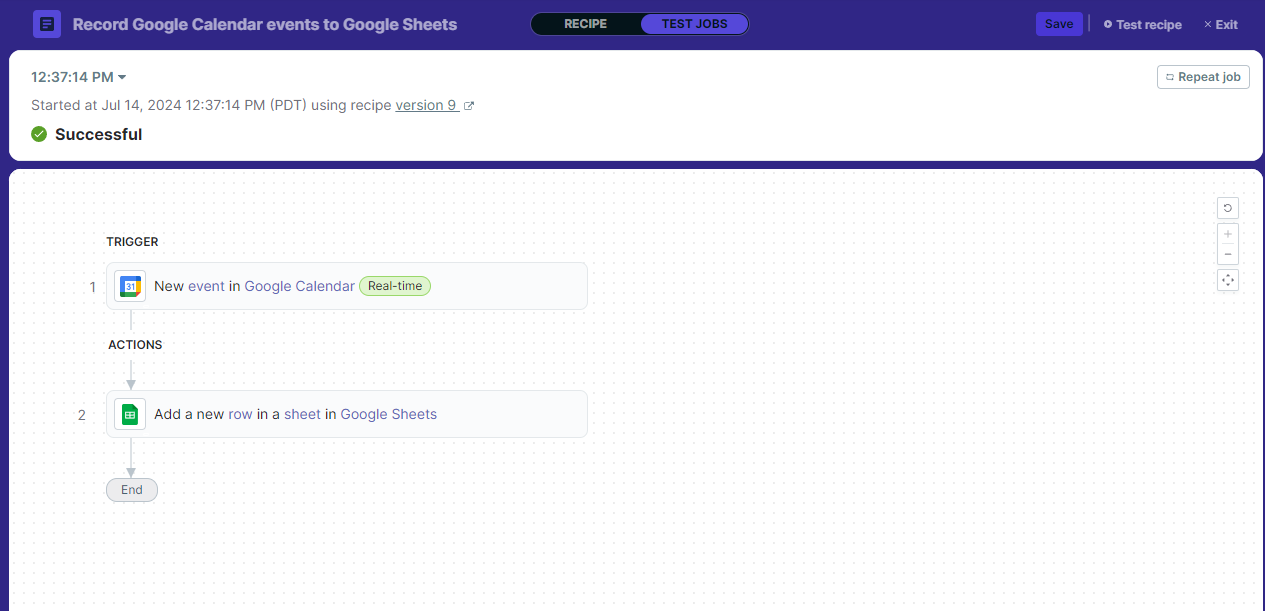
Now that we know it’s working it’s time to check our Google Sheet to see the results. Looking at our Google Sheets all the data has been pulled into our sheet!

Mastering Your First Sitecore Connect Recipe
By following this guide, you've successfully navigated the process of implementing your first community recipe in Sitecore Connect. You've learned how to explore the community library, select a recipe that suits your business needs, and customize it to better fit your workflows. With the ability to automate tasks and integrate various services seamlessly, Sitecore Connect empowers you to boost efficiency and consistency in your operations. Now that you have a solid grasp on creating and using recipes, you can explore further customizations and build more complex workflows to continue enhancing your business processes. Happy automating!