Resolving Image Issues with Content Hub Integration
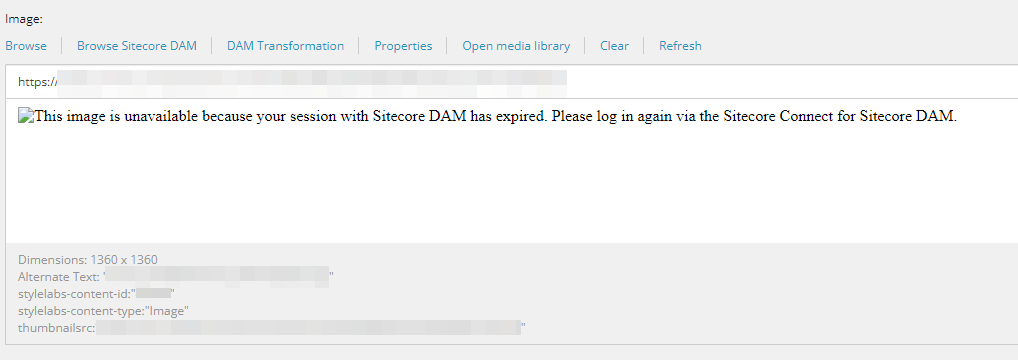
Do you have Content Hub integrated into XM Cloud? Are you seeing broken images when your content authors are selecting images from the Sitecore DAM?
Believe it or not the solution is simple. I’ll also show you how to resolve this issue locally and how to setup the Content Hub integration to work with your local XM Cloud development environment.
Resolve CORS Issues Inside Content Editor
The issue you see above is in all likelihood nothing more than due to a CORS issue that needs to be resolved. In fact, if you open up your Developer Tools in Chrome, navigate to the Console, you’ll probably see something resembling the following.
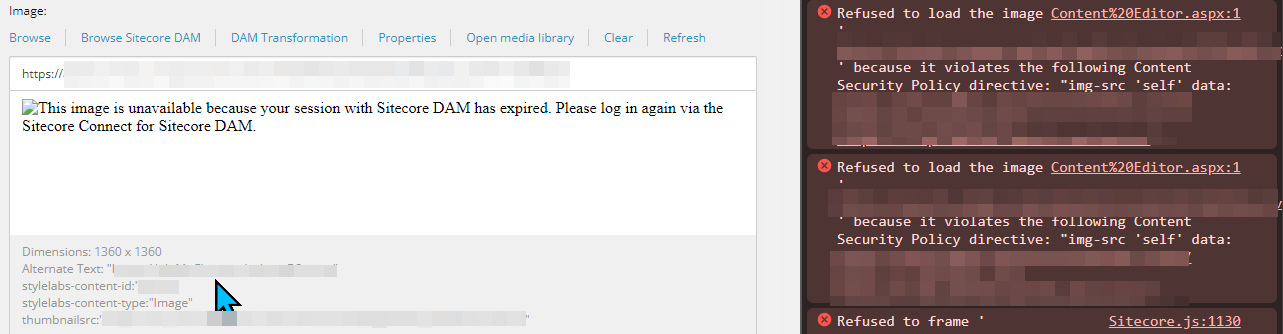
If you do, then it is a CORS error that’s causing those images from loading. After all, if you are using a custom domain for your Sitecore DAM, then that needs to get added.
So how do we do that?
Using Web Config Transforms to Patch Web.config
This is a two step process. In your Visual Studio project, whether it be your platform project or another one you’ve designated, you’ll want to create a folder structure in that project that resembles App_Data\xdts. Inside xdts we’re going to create a file named web.config.xdt. You will want to ensure in the properties it is set to Content.
It’s possible, if you followed Anju’s article on Enabling the Content Hub DAM Connector in an Environment Deployed to XM Cloud then you probably already have this file and you will only need to append the domain that is complaining according to the Content Security Policy directive that it is complaining about. For example: img-src.
<?xml version="1.0" encoding="utf-8"?>
<configuration xmlns:xdt="http://schemas.microsoft.com/XML-Document-Transform">
    <location path="sitecore">
        <system.webServer>
            <httpProtocol>
                <customHeaders>
                    <add name="Content-Security-Policy" value="default-src 'self' 'unsafe-inline' 'unsafe-eval' https://apps.sitecore.net <append domain here>; img-src 'self' data:  <append domain here>; style-src 'self' 'unsafe-inline' https://fonts.googleapis.com; font-src 'self' 'unsafe-inline' https://fonts.gstatic.com; block-all-mixed-content; child-src 'self'  <append domain here>; connect-src 'self'  <append domain here>; ..." xdt:Transform="Replace" xdt:Locator="Match(name)"/>
                </customHeaders>
            </httpProtocol>
        </system.webServer>
    </location>
</configuration>
If you haven’t followed her blog, certainly have a review and get up to speed on any other settings you might be missing.
The second thing is you’ll want to open up your xmcloud.config.json and after postActions add the following bit of JSON.
 "transforms": [
     {
         "xdtPath": "/app_data/xdts/web.config.xdt",
         "targetPath": "/web.config"
     }
 ]
This will allow for the web.config.xdt to be added to the web.config within XM Cloud during the deployment process.
Patching Local Dev Environment to Support CORS
While you might think that deploying this web.config.xdt during the publishing process to your local CM would make everything work, it does not. That said the process getting it to work is not all that painful nor lengthy.
Adding Web.config.xdt to Docker Build
The first step we’re going to do is to copy that same web.config.xdt file over to /docker/build/cm and create a new folder called transforms and paste it into said folder.
The next step is we’re going to add the following lines to our Docker file located under /docker/build/cm.
# Copy transforms folder to container
COPY ./transforms c:\inetpub\wwwroot\transforms

# Perform transforms
RUN (Get-ChildItem -Path 'C:\\inetpub\\wwwroot\\transforms\\web*.xdt' -Recurse ) | `
    ForEach-Object { & 'C:\\tools\\scripts\\Invoke-XdtTransform.ps1' -Path 'C:\\inetpub\\wwwroot\\web.config' -XdtPath $_.FullName `
    -XdtDllPath 'C:\\tools\\bin\\Microsoft.Web.XmlTransform.dll'; };
Finally, you’re going to run: docker-compose build and then re-run docker-compose up -d. This will rebuild the CM container to now incorporate your web.config.xdt.
The only thing you need to remember is each time you change your web.config.xdt you’ll want to rebuild your CM container. This way when you say take a copy of perhaps your QA or production environment and bring it locally, any links that were utilized by a Content Hub integration will / should still work.

Meet David Austin
Development Team Lead | Sitecore Technology MVP x 3
📷🕹️👪
David is a decorated Development Team Lead with Sitecore Technology MVP and Coveo MVP awards, as well as Sitecore CDP & Personalize Certified. He's worked in IT for 25 years; everything ranging from Developer to Business Analyst to Group Lead helping manage everything from Intranet and Internet sites to facility management and application support. David is a dedicated family man who loves to spend time with his girls. He's also an avid photographer and loves to explore new places.