Reading time: 13 min read

Introduction To Publishing Targets
As you probably know, Sitecore standards send content from Master to Web database. In order to move items from master database to live (web) database, we use the Publish option. Towards bottom of the publishing window, you may have seen the Publishing Targets section.

Sitecore also provides a way to add more publishing targets. In this blog post, I am going to explain how to add a new publishing target in Sitecore.
Use Case Of Adding A New Publishing Target
By default, items that are in a workflow can only be published if the items are in the final workflow state. However, in situations where you need to publish an item before it reaches the final workflow state, for example, if you want the item to be reviewed by a non-Sitecore user, you can publish the item to a preview publishing target. You can refer to my other blog Publishing To Preview Environments In Sitecore Using Workflow for more detail.
How To Add A Publishing Target
1. Where are these publishing targets coming from? Go to /sitecore/system/Publishing targets and create a new publishing target.

2. Provide Target Database name.

3. Create new target database in ConnectionStrings.config where you want content to be published. The name should be same as provided in Target Database in Step 1.
<add name="preview" connectionString="Data Source=.;Initial Catalog=web_preview;User ID=;Password=" />
4. Create a configuration patch file (best practices suggest making a patch file) OR follow Steps 5-8.
Create a patch file under C:\inetpub\wwwroot\instancename\App_Config\Include\Project\ or any other folder based on your project architecture.
<?xml version="1.0" encoding="utf-8" ?>
 <configuration xmlns:patch="http://www.sitecore.net/xmlconfig/">
     <sitecore>
         <eventing defaultProvider="sitecore">
            <eventQueueProvider>
                <eventQueue name="preview" patch:after="eventQueue[@name='web']" type="Sitecore.Data.Eventing.$(database)EventQueue, Sitecore.Kernel">
                     <param ref="dataApis/dataApi[@name='$(database)']" param1="$(name)" />
                     <param hint="" ref="PropertyStoreProvider/store[@name='$(name)']" />
                </eventQueue>
            </eventQueueProvider>
         </eventing>
         <PropertyStoreProvider>
             <store name="preview" patch:after="store[@name='web']" prefix="preview" getValueWithoutPrefix="true" singleInstance="true" type="Sitecore.Data.Properties.$(database)PropertyStore, Sitecore.Kernel">
                  <param ref="dataApis/dataApi[@name='$(database)']" param1="$(name)" />
                  <param resolve="true" type="Sitecore.Abstractions.BaseEventManager, Sitecore.Kernel" />
                  <param resolve="true" type="Sitecore.Abstractions.BaseCacheManager, Sitecore.Kernel" />
             </store>
         </PropertyStoreProvider>
         <databases>
         <!-- Preview-->
             <database id="preview" patch:after="database[@id='web']" singleInstance="true" type="Sitecore.Data.DefaultDatabase, Sitecore.Kernel">
                 <param desc="name">$(id)</param>
                 <icon>Images/database_web.png</icon>
                 <securityEnabled>true</securityEnabled>
                 <dataProviders hint="list:AddDataProvider">
                     <dataProvider ref="dataProviders/main" param1="$(id)">
                         <disableGroup>publishing</disableGroup>
                         <prefetch hint="raw:AddPrefetch">
                              <sc.include file="/App_Config/Prefetch/Common.config" />
                              <sc.include file="/App_Config/Prefetch/Webdb.config" />
                         </prefetch>
                     </dataProvider>
                 </dataProviders>
                <PropertyStore ref="PropertyStoreProvider/store[@name='$(id)']" />
                    <remoteEvents.EventQueue>
                        <obj ref="eventing/eventQueueProvider/eventQueue[@name='$(id)']" />
                    </remoteEvents.EventQueue>
                    <archives hint="raw:AddArchive">
                        <archive name="archive" />
                        <archive name="recyclebin" />
                    </archives>
                    <cacheSizes hint="setting">
                         <data>100MB</data>
                         <items>50MB</items>
                         <paths>2500KB</paths>
                         <itempaths>50MB</itempaths>
                         <standardValues>2500KB</standardValues>
                    </cacheSizes>
              </database>
         </databases>
     </sitecore>
 </configuration>
Note – If you are creating a patch file as per Step 3, you are done! Otherwise follow the steps below.
5. Navigate to your Sitecore.config file, and find for <database id="web" (around line 1100) and copy it from <!– web –>.
Paste the content, modify the following entries, and save the file <!– web –> to <!– preview –> (comment update for future reference) <database id=”web” to <database id=preview (must change).
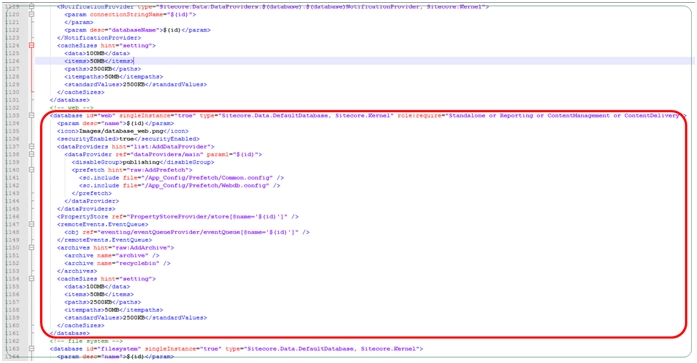
    <database id="preview" singleInstance="true" type="Sitecore.Data.DefaultDatabase, Sitecore.Kernel" role:require="Standalone or Reporting or ContentManagement or ContentDelivery">
      <param desc="name">$(id)</param>
      <icon>Images/database_web.png</icon>
      <securityEnabled>true</securityEnabled>
      <dataProviders hint="list:AddDataProvider">
        <dataProvider ref="dataProviders/main" param1="$(id)">
          <disableGroup>publishing</disableGroup>
          <prefetch hint="raw:AddPrefetch">
            <sc.include file="/App_Config/Prefetch/Common.config" />
            <sc.include file="/App_Config/Prefetch/Webdb.config" />
          </prefetch>
        </dataProvider>
      </dataProviders>
      <PropertyStore ref="PropertyStoreProvider/store[@name='$(id)']" />
      <remoteEvents.EventQueue>
        <obj ref="eventing/eventQueueProvider/eventQueue[@name='$(id)']" />
      </remoteEvents.EventQueue>
      <archives hint="raw:AddArchive">
        <archive name="archive" />
        <archive name="recyclebin" />
      </archives>
      <cacheSizes hint="setting">
        <data>100MB</data>
        <items>50MB</items>
        <paths>2500KB</paths>
        <itempaths>50MB</itempaths>
        <standardValues>2500KB</standardValues>
      </cacheSizes>
    </database>
6. Next (in Sitecore.config only) find the following entry eventQueue=”web” (around line 350) and copy those lines highlighted in the red square.
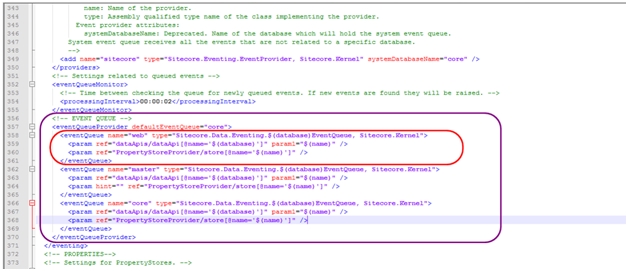
Paste after the </eventQueue> and modify the following entry <eventQueue name=”web” to <eventQueue name=”preview″
<eventQueue name="preview" type="Sitecore.Data.Eventing.$(database)EventQueue, Sitecore.Kernel">
      <param ref="dataApis/dataApi[@name='$(database)']" param1="$(name)" />
      <param hint="" ref="PropertyStoreProvider/store[@name='$(name)']" />
    </eventQueue>
7. Now, find (in Sitecore.config only) the following entry <store name=”web” (around line 385) and copy those lines highlighted in the red square.
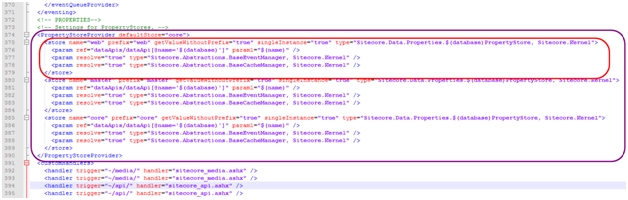
Paste after the </store> and modify the following entry <store name=”web” to <store name=” preview ″ AND prefix=”web” to prefix=”preview″
  <store name=" preview " prefix=" preview " getValueWithoutPrefix="true" singleInstance="true" type="Sitecore.Data.Properties.$(database)PropertyStore, Sitecore.Kernel">
    <param ref="dataApis/dataApi[@name='$(database)']" param1="$(name)" />
    <param resolve="true" type="Sitecore.Abstractions.BaseEventManager, Sitecore.Kernel" />
    <param resolve="true" type="Sitecore.Abstractions.BaseCacheManager, Sitecore.Kernel" />
  </store>
8. Save your Sitecore.config and access your Content Management again.
Now, give a try and go to Publish and you will see an extra option for Publishing Targets.

Note - Don’t forget that your new database (Preview) for publishing target needs to be present in SQL Server otherwise you will get an exception.
Additional Tip
If you have multiple publishing targets then you will see all of them in the publishing window as checkbox items. If you want to set any of these publishing target database as your default target database, then you can configure it via DefaultPublishingTargets setting in web.config file.
<setting name="DefaultPublishingTargets" value="QA" />

Happy coding!